
Spider Cupcakes Recipe
If you’re looking for a fun and spooky treat that doubles as a conversation starter, you’ve got to try this Spider Cupcakes Recipe. These little creepy-crawly cupcakes are perfect for Halloween parties, classroom treats, or any time you want to add a little whimsy to your dessert table. What I absolutely love about this recipe is how simple it is to put together yet how striking and festive it looks. Plus, who doesn’t love a chocolate cupcake paired with licorice legs and candy eyes? It’s playful, delicious, and guaranteed to make everyone smile.
This Spider Cupcakes Recipe also shines because you don’t need any special cooking skills or hard-to-find ingredients. I remember the first time I made these with my niece—she was actually more interested in crafting the spider legs than eating the cupcakes! It’s a great way to get kids involved, and you’ll appreciate how that combination of chocolate, licorice, and bright candy bits creates a delicious flavor fiesta. Whether you’re hosting a party or just want a creative spin on cupcakes, these spiders won’t disappoint!
Ingredients You’ll Need
Each ingredient in this Spider Cupcakes Recipe plays a part in creating the perfect balance between spooky decor and scrumptious flavor. Shopping tip: pick a rich chocolate cake mix as the base since it pairs wonderfully with the bright candy accents and bold licorice legs.
- Chocolate cake mix: Use your favorite boxed chocolate cake mix for an easy, reliable base.
- Black shoestring licorice: These are perfect for the spider legs—choose a pliable licorice so you can bend and position the legs easily.
- White frosting: Smooth, thick white frosting works best to create a “body” for your spider and a surface for the candy eyes.
- Candy corn: Use these to create the spider’s eyes—bright, triangular, and oh so festive.
- Cinnamon red hot candies: These add a fun pop of color for the pupils and of course, a spicy little kick!
- Orange decorator sugar: A sprinkle of this adds a shiny, festive finish to your spider buddies.
Variations
I like to mix things up depending on the occasion or who’s coming over. The best part about the Spider Cupcakes Recipe is that you can easily tweak it to make it your own or fit dietary needs.
- Variation: For a gluten-free version, I’ve swapped the boxed cake mix with a gluten-free chocolate cake mix. It still tastes fantastic and everyone loved it.
- Variation: Want a less sweet option? Try using cream cheese frosting tinted black instead of white frosting—it gives a slightly tangier spider body and looks great, too.
- Variation: For a colorful twist, swap the black licorice for red or green licorice to match different party themes or holiday colors.
How to Make Spider Cupcakes Recipe
Step 1: Bake Your Chocolate Cupcakes
Start by preparing the chocolate cake mix according to the package instructions—usually this means mixing it with eggs, oil, and water. Pour your batter into cupcake liners about two-thirds full and bake at the recommended temperature until a toothpick inserted comes out clean (usually around 18-22 minutes). Let these cool completely before decorating—patience here is key because frosting slides right off warm cupcakes!
Step 2: Frost the Cupcakes
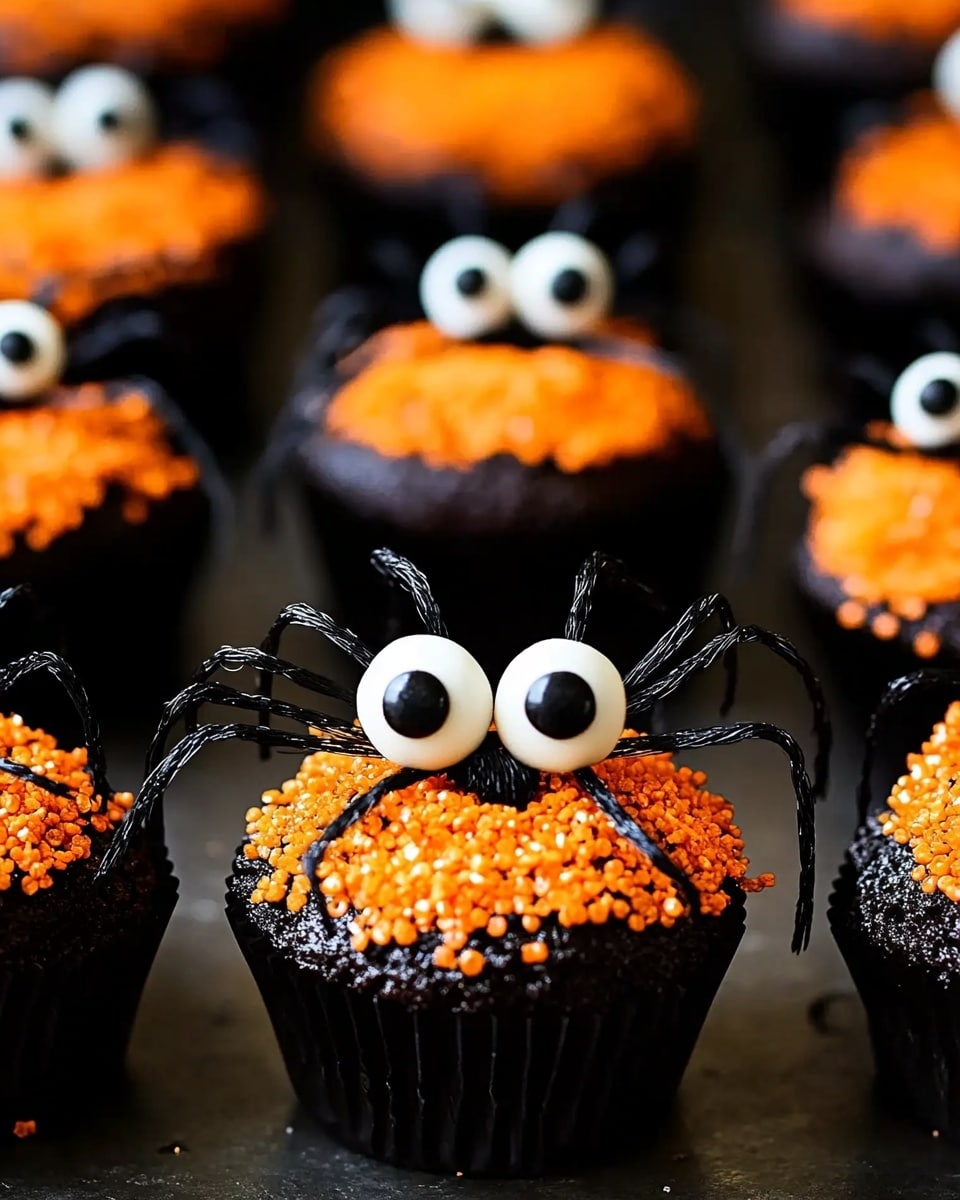
Spoon or spread a generous dollop of white frosting on each cooled cupcake—think of it as the round body of your spider. Use an offset spatula or the back of a spoon to smooth the frosting into a nice dome shape. This gives you a great surface for attaching the candy eyes and legs.
Step 3: Create Legs with Licorice
Cut the black licorice into strips about 3-4 inches long—these will be your spider’s legs. You’ll want eight legs per cupcake, four on each side. Gently press each licorice leg into the frosting at an angle so they look like they’re crawling right off the cupcake. If the frosting is a bit soft, refrigerate for a few minutes to help them stick better.
Step 4: Add Candy Eyes
Place two candy corn pieces near the top center of the cupcake for the spider’s eyes. Then, add a cinnamon red hot candy on each candy corn tip to create pupils—this gives the spiders a fun, slightly wicked look. The colors pop beautifully against the white frosting, making these eyes look alive!
Step 5: Sprinkle with Orange Sugar
Finish off your spider cupcakes with a light sprinkle of orange decorator sugar over the frosting. It not only adds a delightful crunch but also gives a festive shimmer perfect for Halloween.
How to Serve Spider Cupcakes Recipe
Garnishes
I usually stick with the candy eyes and the sprinkled decorator sugar—it keeps things simple but festive. If you want, you can add little edible glitter or black sprinkles around the edges for an extra spooky effect. I’ve even tossed in some tiny plastic spiders for a dramatic presentation at parties (just remember to remove them before eating!).
Side Dishes
These cupcakes pair wonderfully with other Halloween-themed treats like pumpkin spice cookies or a bowl of caramel popcorn. If you’re serving kids, a side of fresh fruit skewers in autumn colors adds a nice balance. For adults, a rich hot chocolate or coffee is the perfect partner.
Creative Ways to Present
Try placing these Spider Cupcakes Recipe on a black platter lined with faux spider webs or surrounded by candy pumpkins. I once made a whole “spooky forest” dessert table using green-tinted coconut flakes as grass—they looked fantastic! Even just stacking cupcakes on a tiered stand with little Halloween confetti scattered around makes an impressive display.
Make Ahead and Storage
Storing Leftovers
Once decorated, I store leftover spider cupcakes in an airtight container at room temperature if I plan to eat them within 2 days. If it’s warm or humid, I prefer the fridge to keep the licorice from becoming too soft or sticky. Just let refrigerated cupcakes come to room temperature before serving for best flavor and texture.
Freezing
I’ve frozen undecorated chocolate cupcakes before successfully by wrapping them tightly with plastic wrap and placing them in freezer bags. After thawing in the fridge overnight, you can decorate with frosting and spider toppings fresh, which keeps the licorice and candies perfectly crisp.
Reheating
Since these cupcakes are best served at room temperature, I don’t recommend microwaving decorated cupcakes (the heat warps the licorice and melts candies). Instead, just take them out of the fridge 30 minutes before eating; you’ll find the flavor and texture much better this way.
FAQs
-
Can I make the Spider Cupcakes Recipe without licorice?
Absolutely! If you’re not a fan of licorice or can’t find it easily, you can use pretzel sticks or thin chocolate sticks for the spider legs. While they won’t have the chewy texture of licorice, they create a similar visual effect and taste great.
-
How long do Spider Cupcakes stay fresh?
When stored properly in an airtight container at room temperature, these cupcakes stay fresh for 2-3 days. Refrigerating can extend their life to about 5 days, but the licorice may soften over time.
-
Can I make these cupcakes from scratch instead of using boxed mix?
Definitely! A homemade chocolate cupcake recipe works just as well. The boxed mix just saves time and effort, especially if you’re making a big batch for a party.
Final Thoughts
Making these Spider Cupcakes Recipe always puts me in a playful mood. They remind me of fun Halloween gatherings filled with laughter, and they’re simple enough that even beginner bakers feel like pros. I highly recommend giving this recipe a try—you’ll love how it brings a little joy and spookiness to your table without any fuss. Plus, seeing those “spiders” come to life on your cupcakes is just too much fun to resist.
PrintSpider Cupcakes Recipe
Fun and spooky Spider Cupcakes made with rich chocolate cake, topped with creamy white frosting, licorice legs, candy corn eyes, and red hot candy noses. Perfect for Halloween parties or themed events, these cupcakes combine easy-to-use ingredients with creative decoration for a festive treat kids and adults will love.
- Prep Time: 15 minutes
- Cook Time: 20 minutes
- Total Time: 35 minutes
- Yield: 48 cupcakes
- Category: Baking
- Method: Baking
- Cuisine: American
Ingredients
Cake
- 1 (18.25 ounce) package chocolate cake mix
Decorations
- 1 pound black shoestring licorice
- 1 (16 ounce) can white frosting
- 48 pieces candy corn
- 48 cinnamon red hot candies
- ¼ cup orange decorator sugar
Instructions
- Prepare the Cake Batter: Follow the instructions on the chocolate cake mix package to prepare the batter. This typically involves combining the cake mix with eggs, oil, and water as specified on the box.
- Bake the Cupcakes: Pour the batter into a cupcake pan lined with paper liners, filling each about two-thirds full. Bake as directed on the cake mix package, usually around 18-22 minutes at 350°F (175°C), until a toothpick inserted comes out clean. Let cupcakes cool completely.
- Apply the Frosting: Once the cupcakes are fully cooled, spread a generous layer of white frosting over each cupcake to create a smooth surface for decorating.
- Create Spider Legs: Cut black shoestring licorice into pieces approximately 3-4 inches long. Insert 8 pieces around the sides of each cupcake to represent the spider’s legs, bending slightly to create a curved leg effect.
- Add Eyes and Nose: Place 2 candy corn pieces near the top of the cupcake to make the spider’s eyes. Then place one cinnamon red hot candy below the eyes to serve as the spider’s nose or mouth.
- Sprinkle Decorator Sugar: Lightly sprinkle ¼ cup of orange decorator sugar over the frosting and decorations to add a festive, sparkly finish to each spider cupcake.
Notes
- Ensure cupcakes are completely cool before frosting to prevent melting.
- You can substitute black licorice with any black candy sticks if preferred.
- For a less sweet version, use a reduced sugar frosting.
- These cupcakes keep well for 2-3 days stored in an airtight container at room temperature.
- Remove the candied eyes and nose if serving to very young children to avoid choking hazards.