Red Velvet Cheesecake Bliss Recipe
Okay, so if you’ve ever dreamed of the perfect dessert that blends rich, velvety cake with creamy cheesecake, this Red Velvet Cheesecake Bliss Recipe is it. Honestly, it’s one of those treats that feels fancy enough for special occasions but easy enough for a relaxed weekend baking session. The way the classic red velvet cake base pairs with a smooth cheesecake layer? Pure magic.
I usually pull this out when I want to impress friends or just treat my family to something a bit extra. Plus, it’s a crowd-pleaser that manages to look gorgeous and taste incredible without being complicated. Trust me, once you make this Red Velvet Cheesecake Bliss Recipe, you’ll be keeping it in your dessert rotation — it’s that good.
Ingredients You’ll Need
Every ingredient in this Red Velvet Cheesecake Bliss Recipe contributes to that perfect balance of flavors and textures. From the tangy buttermilk that keeps the cake moist to the rich cream cheese that makes the cheesecake layer so luxuriously smooth, each piece plays a role. I always recommend grabbing the freshest cream cheese you can find and real buttermilk for the best results.
- All-purpose flour: The foundation for both cake and cheesecake layers, use good quality flour for the best texture.
- Granulated sugar: Sweetens the cake and cheesecake perfectly; don’t try to skimp here!
- Cocoa powder: Just a touch for that classic red velvet hint of chocolate.
- Baking powder & baking soda: These work together to keep the cake light and fluffy.
- Salt: Balances the sweetness and enriches flavor.
- Buttermilk: Adds moistness and tang — I sometimes swap with homemade buttermilk by adding vinegar to milk.
- Eggs: Help bind everything together and add richness.
- Vegetable oil: Keeps the cake tender; don’t use butter as it changes texture.
- Red food coloring or beetroot powder: The signature red hue! I’ve tried beetroot for a natural option—it’s beautiful but a bit earthier in flavor.
- Vanilla extract: Enhances all the flavors.
- White vinegar: Reacts with baking soda for lift, plus it sharpens the cake’s flavor.
- Cream cheese: The heart of the cheesecake — soften it well for smooth texture.
- Sour cream: Adds extra creaminess and slight tang to the cheesecake.
- All-purpose flour (for cheesecake): Stabilizes the cheesecake filling so it sets just right.
- Heavy cream: For that cloud-like whipped topping, freshly whipped is best.
- Powdered sugar: Sweetens the whipped cream without grit.
- Fresh berries: Optional but they add brightness and color that’s so pretty on top.
- Red velvet cake crumbs: A fun garnish that adds texture and a burst of red color.
Variations
I love mixing things up sometimes with this Red Velvet Cheesecake Bliss Recipe depending on who I’m serving or the season. It’s great to personalize—whether you’re running short on ingredients or just want a twist on the classic.
- Natural red color: I’ve swapped food coloring for beetroot powder a few times, and the color is a bit softer but totally natural and pretty.
- Gluten-free option: Replace all-purpose flour with a gluten-free blend; just be sure it includes xanthan gum for cheesecake stability.
- Dairy-free substitute: Use vegan cream cheese and coconut cream instead of sour cream and heavy cream—I’ve tried it; texture differs but flavor still rocks.
- Chocolate swirl: Adding a small swirl of melted dark chocolate in the cheesecake layer adds richness and a little surprise bite.
How to Make Red Velvet Cheesecake Bliss Recipe
Step 1: Prepare the Red Velvet Cake Batter
Start by mixing your dry ingredients—flour, sugar, cocoa powder, baking powder, baking soda, and salt—in one bowl. In another, whisk together buttermilk, egg, oil, red food coloring (or beetroot powder), vanilla, and vinegar. Pour the wet into the dry and stir just until combined—overmixing will make your cake tough. At this point, your batter should be smooth with that gorgeous deep red color. Pro tip: if you’re using beetroot powder, whisk it with warm water first to help it dissolve evenly.
Step 2: Whip Up the Cheesecake Filling
For the cheesecake layer, beat softened cream cheese until smooth—this is key to avoiding lumps. Add sour cream, sugar, and vanilla, and continue beating until creamy. One by one, incorporate the eggs, mixing gently after each addition, then stir in the flour to keep the filling stable. I always scrape the sides of the bowl to make sure everything is homogenous. The mixture should be rich but still pourable.
Step 3: Layer and Bake to Perfection
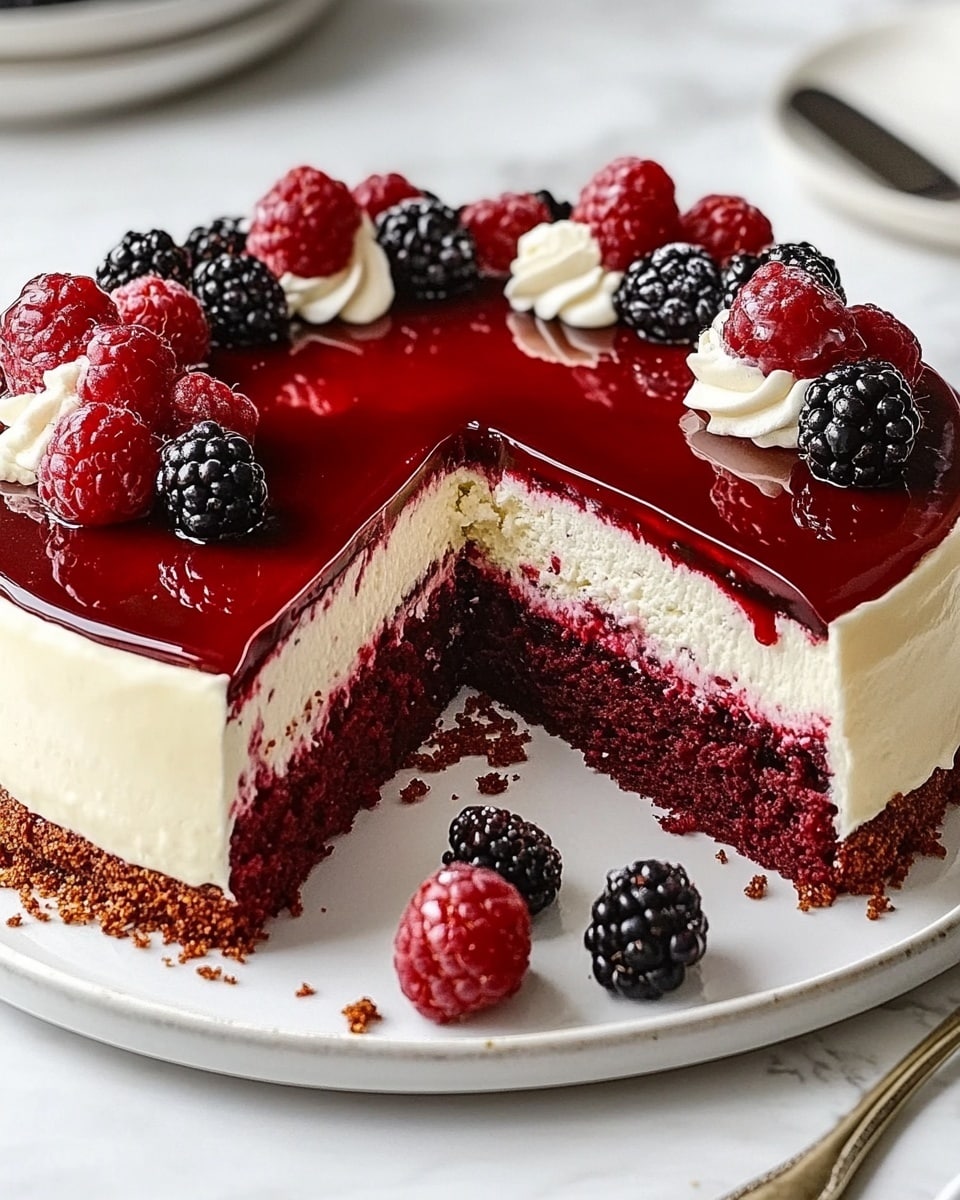
Pour about half of the red velvet batter into your prepared springform pan. Carefully spoon the cheesecake filling on top, spreading it evenly but gently—you don’t want to blend the layers. Finally, dollop the remaining cake batter on top. Use a knife to swirl slightly if you like that marbled effect. Bake at 325°F (160°C) for about 60 minutes, or until the edges are set but the center still jiggles slightly—this helps keep it creamy, not dry. Let it cool completely before removing the pan ring.
Step 4: Whip Cream and Add Finishing Touches
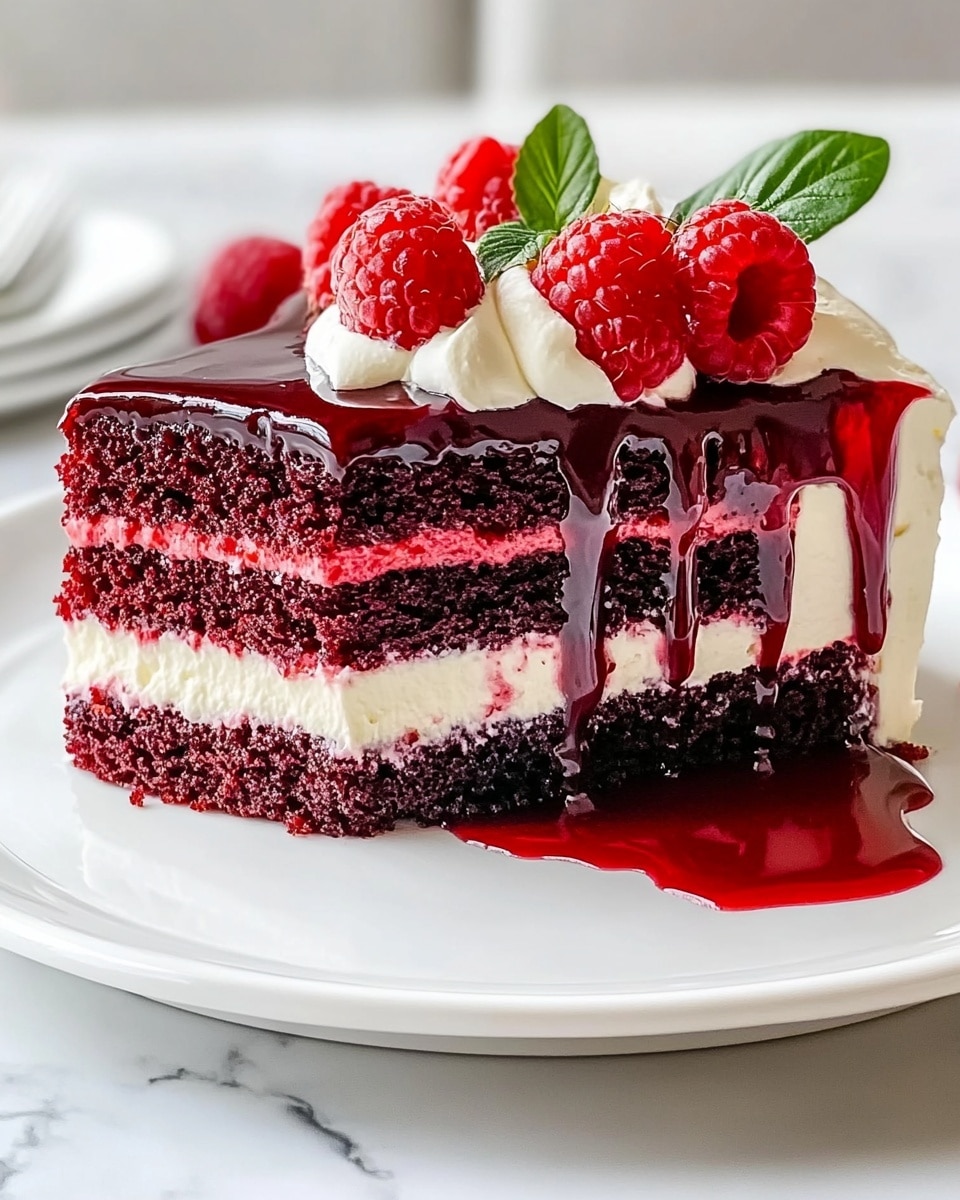
While the cheesecake chills, whip the heavy cream with powdered sugar and vanilla until soft peaks form. This topping is light, balancing the richness of the dessert beautifully. Spread or pipe it on once the cake is fully cooled. If you want, sprinkle fresh berries and a few red velvet crumbs on top for color and texture—this step really makes the cake pop at parties!
How to Serve Red Velvet Cheesecake Bliss Recipe
Garnishes
I usually go with fresh raspberries or strawberries because their tartness contrasts so nicely with the sweet richness. Sometimes, I crumble a bit of extra red velvet cake on top for that gorgeous, rustic look and extra texture. If you want to be fancy, a light dusting of cocoa powder or a drizzle of white chocolate works wonders too.
Side Dishes
This dessert really shines on its own, but I like serving it with a simple cup of freshly brewed coffee or a bold black tea to cut through the richness. If you’re hosting brunch, a side of fresh fruit salad balances the indulgence nicely without stealing the show.
Creative Ways to Present
For a special occasion, I’ve layered this Red Velvet Cheesecake Bliss Recipe into parfait glasses with extra whipped cream and berries for an elegant twist. Another fun idea is creating mini versions in cupcake liners—perfect for parties or gift boxes. You could even pipe whipped cream rosettes and sprinkle edible glitter for a festive touch.
Make Ahead and Storage
Storing Leftovers
I always keep leftover Red Velvet Cheesecake Bliss Recipe airtight in the fridge, where it stays fresh for up to 4 days. Cover it well to prevent the cake from drying out and to keep the whipped cream topping from absorbing fridge odors. It tastes even better after a day once the flavors have melded!
Freezing
If you want to freeze it, I recommend freezing before adding the whipped cream topping. Wrap tightly in plastic wrap and then foil to avoid freezer burn. I’ve frozen it for up to 2 months without a noticeable difference in taste or texture. Just thaw overnight in the fridge before whipping fresh cream to top.
Reheating
I don’t usually reheat cheesecake, but if you want a slightly warmer slice, leaving it at room temperature for about 30 minutes is enough to soften it slightly. Avoid microwaving as it can ruin the texture. If you do want it warm, try a very gentle warm-up in the oven at 200°F (95°C) for 10–15 minutes, but be careful.
FAQs
-
Can I make the Red Velvet Cheesecake Bliss Recipe without food coloring?
Absolutely! You can replace red food coloring with natural alternatives like beetroot powder or juice. Keep in mind the color will be more muted and might add a slight earthy note, but it’s a great way to avoid artificial dyes.
-
How do I prevent cracks in the cheesecake layer?
To avoid cracks, make sure you don’t overmix the cheesecake batter, and bake at a lower temperature to allow even cooking. Cooling the cake gradually and avoiding sudden temperature changes also helps keep that smooth surface.
-
Can I make this recipe ahead for a party?
Yes! This cheesecake actually tastes better after chilling overnight as the flavors deepen and the layers set perfectly. Just keep it covered in the fridge, and add whipped cream topping right before serving for the freshest look.
-
What pan should I use for baking?
A 9-inch springform pan is ideal as it makes removing the cake easy without damaging the layers. Make sure to line the base with parchment paper and lightly grease the sides for a smooth release.
Final Thoughts
Honestly, the Red Velvet Cheesecake Bliss Recipe has become one of my absolute favorites because it delivers that wow factor every time—without being intimidating to make. It’s the kind of dessert that feels like a hug on a plate, rich yet light, colorful, and irresistibly delicious. If you haven’t tried baking it yet, grab your apron and give it a whirl—your taste buds (and anyone you share it with) will thank you!
PrintRed Velvet Cheesecake Bliss Recipe
Red Velvet Cheesecake Bliss is a decadent dessert featuring a moist red velvet cake base layered with a creamy, smooth cheesecake topping, finished with a light whipped cream topping. This beautiful dessert combines the rich flavors of red velvet and classic cheesecake, making it perfect for special occasions or indulgent treats.
- Prep Time: 25 minutes
- Cook Time: 65 minutes
- Total Time: 5 hours 30 minutes
- Yield: 12 servings
- Category: Dessert
- Method: Baking
- Cuisine: American
Ingredients
Red Velvet Cake Layer
- 1 ½ cups all-purpose flour
- 1 cup granulated sugar
- 1 tbsp cocoa powder
- 1 tsp baking powder
- ½ tsp baking soda
- ½ tsp salt
- 1 cup buttermilk
- 1 large egg
- ½ cup vegetable oil
- 2 tbsp red food coloring or beetroot powder for natural option
- 1 tsp vanilla extract
- 1 tsp white vinegar
Cheesecake Layer
- 16 oz cream cheese, softened
- ½ cup sour cream
- ½ cup granulated sugar
- 2 large eggs
- 1 tsp vanilla extract
- 2 tbsp all-purpose flour
Whipped Cream Topping
- 1 cup heavy cream
- 2 tbsp powdered sugar
- 1 tsp vanilla extract
Garnish (optional)
- Fresh berries
- Red velvet cake crumbs
Instructions
- Prepare Red Velvet Cake Batter: In a large mixing bowl, sift together all-purpose flour, sugar, cocoa powder, baking powder, baking soda, and salt. In a separate bowl, whisk together buttermilk, egg, vegetable oil, red food coloring (or beetroot powder), vanilla extract, and white vinegar until well combined. Gradually add the wet ingredients to the dry ingredients and stir until just combined, ensuring the batter is smooth but not overmixed.
- Prepare Cheesecake Mixture: In a separate bowl, beat the softened cream cheese until smooth and creamy. Add sour cream, granulated sugar, eggs, vanilla extract, and all-purpose flour. Mix until fully incorporated and smooth, avoiding overmixing to prevent cracks.
- Assemble the Layers: Preheat the oven to 325°F (163°C). Grease and line a 9-inch springform pan. Pour the red velvet cake batter evenly into the prepared pan. Carefully dollop the cheesecake mixture over the cake batter. Using a knife or skewer, gently swirl the cheesecake layer into the cake batter to create a marbled effect.
- Bake the Cake: Place the pan in the preheated oven and bake for approximately 60 to 70 minutes, or until the edges are set and the center is slightly jiggly but not liquid. To prevent cracking, you may place a water bath under the pan during baking. Once baked, remove from oven and allow it to cool to room temperature.
- Chill the Cheesecake: After the cake has cooled completely, refrigerate for at least 4 hours or overnight to allow the cheesecake layer to set fully.
- Prepare Whipped Cream Topping: In a chilled bowl, beat heavy cream with powdered sugar and vanilla extract until stiff peaks form. Keep refrigerated until ready to use.
- Serve and Garnish: Before serving, spread or pipe the whipped cream topping evenly over the cheesecake. Garnish with fresh berries and sprinkle with red velvet cake crumbs if desired. Slice and serve chilled for the best texture and flavor.
Notes
- Ensure the cream cheese is softened to avoid lumps in the cheesecake layer.
- Using a water bath during baking reduces the risk of cracks in the cheesecake.
- You can substitute beetroot powder for red food coloring to make the dessert more natural.
- Make sure to chill the cake for proper setting and easier slicing.
- Fresh berries such as raspberries or strawberries complement the flavor and add a fresh contrast.