
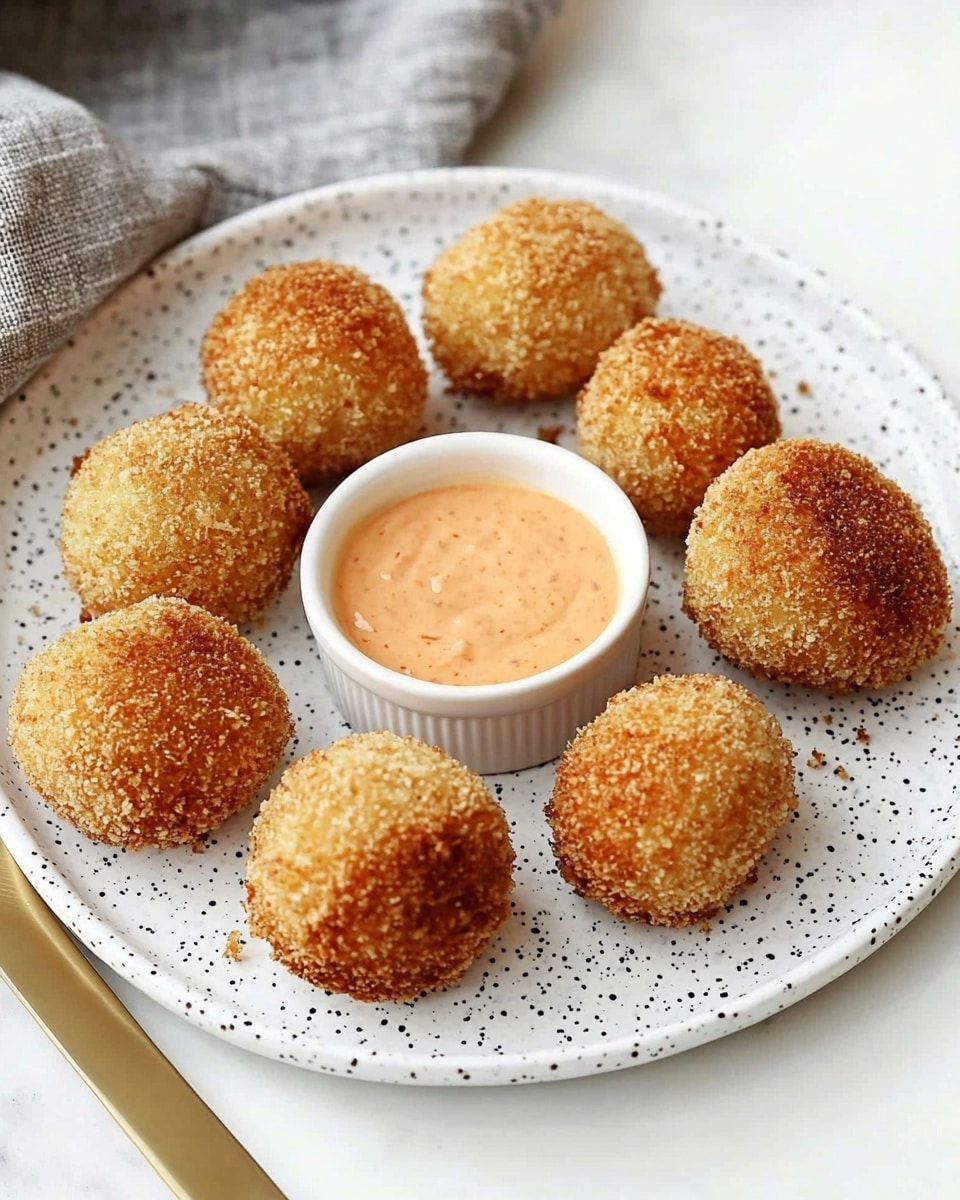
Healthier Chicken Coxinhas with Cream Cheese Filling Recipe
I’m so excited to share with you this Healthier Chicken Coxinhas with Cream Cheese Filling Recipe — it’s a game-changer for anyone who loves Brazilian flavors but wants to keep things on the lighter side. These little bite-sized delights pack all the comforting, creamy goodness of the traditional coxinhas without all the fried heaviness. Perfect for a snack, appetizer, or even party food, they’re surprisingly easy to make at home and way better than takeout.
What I love most about this Healthier Chicken Coxinhas with Cream Cheese Filling Recipe is how it uses an air fryer instead of deep frying, which saves so much oil and calories, but still delivers that crispy, golden crust. Plus, the filling is rich, creamy, and full of savory notes from fresh herbs and cream cheese, making each bite irresistible. I guarantee you’ll find yourself making these again and again once you try them!
Ingredients You’ll Need
Each ingredient in this recipe was chosen to balance flavor and a healthier profile — the chicken broth keeps the dough moist without excess fat, and the cream cheese adds just the right creaminess to the filling. When shopping, try to pick fresh, quality chicken breast for the best texture and flavor.
- Chicken breast: Use skinless, boneless for lean protein and easier shredding.
- Onion: Adds sweetness and depth — make sure to chop finely so it blends smoothly.
- Garlic clove: Fresh is best for aromatic punch.
- Olive oil: A little goes a long way in sautéing without too much fat.
- Bay leaf: Optional but brings subtle complexity to the broth.
- Tomato paste: Adds richness and beautiful color — I always use it for a vibrant filling.
- Cream cheese (Catupiry or similar): Key for that traditional creamy texture inside the coxinhas.
- Parsley or green onion: Fresh herbs brighten up the filling and balance richness.
- Salt and black pepper: Essential to season both the filling and dough properly.
- Chicken broth: Use low sodium if possible, reserved from cooking chicken for that flavor boost.
- All-purpose flour: Creates tender, pliable dough that’s easy to shape.
- Butter: Adds a subtle richness and helps dough elasticity.
- Egg (beaten): Helps the breadcrumb coating stick perfectly.
- Cooking spray or oil: Just enough to ensure the coxinhas crisp up beautifully in the air fryer.
- Breadcrumbs (preferably panko): Creates that coveted crunchy exterior without frying.
Variations
I love tinkering with this recipe depending on what I have on hand or how I’m feeling — it’s pretty flexible! Feel free to personalize the filling or coating to fit your tastes or dietary needs.
- Cheese swap: Sometimes I use light cream cheese or even mozzarella to lighten things further, and it still tastes great.
- Herb boost: Adding cilantro or basil instead of parsley changed things up deliciously when I wanted an herb twist.
- Spicy kick: Mix in a bit of finely chopped jalapeño or a dash of smoked paprika for a subtle heat that really wakes up the filling.
- Gluten-free option: You can substitute all-purpose flour with a gluten-free blend and use gluten-free breadcrumbs — just watch dough consistency as it may need adjusting.
- Baking instead of air frying: If you don’t have an air fryer, baking at 375°F (190°C) until golden works well too (about 20 minutes), though air frying gives a nicer crunch.
How to Make Healthier Chicken Coxinhas with Cream Cheese Filling Recipe
Step 1: Cook and Shred the Chicken
Start by poaching the chicken breast gently in water with the bay leaf until cooked through (about 15 minutes). This keeps the meat tender and juicy, perfect for shredding. Once cooled slightly, shred the chicken using forks or your hands — I find shredding by hand gives a more rustic texture that holds the filling beautifully.
Step 2: Prepare the Flavorful Filling
Sauté the finely chopped onion and garlic in a teaspoon of olive oil until fragrant and translucent. Stir in your tomato paste and shredded chicken, letting the flavors meld together over low heat for a few minutes. Then, fold in the cream cheese and fresh herbs, seasoning with salt and pepper to taste. The filling should be creamy but not wet — this helps it stay inside the dough without leaking out.
Step 3: Make the Elastic Dough
Reserve 1 ½ cups of the chicken broth — you’ll use this to form the dough. In a pot, combine the broth, butter, and a pinch of salt, bringing it to a gentle boil. Slowly add the flour all at once, stirring vigorously with a wooden spoon until the mixture starts pulling away from the sides and forms a soft ball. This step may take a couple minutes, so be patient — the dough should be smooth and elastic, not sticky.
Step 4: Shape Your Coxinhas
Once the dough cools enough to handle, take a golf ball-sized piece and flatten it into a small disk with your hands. Spoon a generous amount of filling in the center, then carefully fold the edges over to seal, shaping it into a teardrop or drumstick shape. Don’t rush this step — if the dough cracks while shaping, dampen your fingers slightly with water to smooth edges. This shaping is the most fun part and worth taking your time on!
Step 5: Coat and Prepare for Air Frying
Dip each shaped coxinha into the beaten egg, then roll in panko breadcrumbs until fully coated. This double-step ensures a crispy outer layer that browns beautifully. Place them on a tray lightly sprayed with cooking spray or brushed with oil to keep them from sticking.
Step 6: Air Fry to Golden Perfection
Preheat your air fryer to around 375°F (190°C). Arrange the coxinhas in a single layer without overcrowding. Cook for about 15 minutes, flipping halfway through to ensure even crisping on all sides. You’ll know they’re done when they’re a gorgeous golden brown and sound crispy when tapped. This step is key to enjoying that crunchy exterior without deep frying!
How to Serve Healthier Chicken Coxinhas with Cream Cheese Filling Recipe
Garnishes
I usually sprinkle freshly chopped parsley or green onions on top for a pop of color and freshness. Sometimes, a squeeze of lime juice or a drizzle of spicy mayo adds a bright contrast to the creamy center. I find these simple touches elevate the whole eating experience.
Side Dishes
Pair these coxinhas with a crisp green salad dressed simply with lemon and olive oil or serve alongside some homemade salsa for dipping. I also love offering a small bowl of guacamole or even a smoky chipotle sauce as dippers when I’m entertaining friends — they balance the richness perfectly.
Creative Ways to Present
For special occasions, I like placing the coxinhas on a wooden board lined with banana leaves for that authentic Brazilian vibe. You can also serve them in mini cupcake liners for a neat, individual presentation at parties—plus it makes them super easy to grab! Adding edible flowers or colorful dipping sauces in pretty bowls can turn this humble snack into a festive delight.
Make Ahead and Storage
Storing Leftovers
I store any leftover coxinhas in an airtight container in the fridge for up to 3 days. To keep the coating from getting soggy, I avoid stacking them directly and place parchment paper or paper towels between layers. This little trick helps maintain that crispy texture when reheating.
Freezing
These coxinhas freeze beautifully! I usually flash freeze them on a baking sheet first so they don’t stick together, then transfer them to a freezer-safe bag. They keep well for up to 2 months. When you want some, just pop them straight from the freezer to the air fryer — no need to thaw.
Reheating
To reheat, I find the air fryer works best — set it at 350°F (175°C) and heat for 5-7 minutes until warmed through and crunchy again. This method revives that crisp exterior without drying out the filling like a microwave might. If you don’t have an air fryer, a quick bake in the oven works well too.
FAQs
-
Can I make the dough without chicken broth?
While chicken broth adds great flavor and moisture, you can substitute with vegetable broth or even water if needed. Just keep in mind you might want to add a bit of extra seasoning to compensate.
-
Is it possible to bake these instead of air frying?
Absolutely! Baking at 375°F (190°C) for about 20 minutes or until golden works well if you don’t have an air fryer. The crust will be slightly less crunchy but still tasty.
-
What can I use if I don’t have Catupiry cream cheese?
You can use regular cream cheese or any mild, spreadable cheese you like. I’ve used mozzarella or ricotta mixed with a little cream for a similar creamy texture.
-
How do I prevent the filling from leaking?
Make sure your filling isn’t too wet — cook off excess moisture during sautéing and let the filling cool before filling the dough. Also, pinch the dough edges firmly to seal and dampen your fingers with water if needed to help the dough stick together better.
-
Can I make these ahead of time?
Yes! You can shape the coxinhas and keep them refrigerated for a few hours before air frying, or freeze them uncooked and cook from frozen later. Just be sure to keep them well covered.
Final Thoughts
This Healthier Chicken Coxinhas with Cream Cheese Filling Recipe holds a special place in my kitchen because it combines nostalgic flavors with wholesome ingredients and a lighter cooking method. It’s fantastic knowing I can indulge in these crispy, creamy bites without the guilt of deep frying. I really hope you try making them — they’re a crowd-pleaser every time and such a fun way to share a traditional Brazilian treat with a healthier twist.
PrintHealthier Chicken Coxinhas with Cream Cheese Filling Recipe

This healthier Coxinhas recipe offers a classic Brazilian snack reinvented with a lean chicken breast filling and baked instead of fried for a lighter yet equally delicious treat. The filling combines tender chicken, sautéed onions, garlic, and creamy Catupiry cheese, wrapped in a soft dough made from chicken broth and all-purpose flour. The coxinhas are coated in panko breadcrumbs and air-fried for a crispy, golden exterior without excess oil, delivering a perfect balance of flavor and health.
- Prep Time: 25 minutes
- Cook Time: 25 minutes
- Total Time: 50 minutes
- Yield: 12 coxinhas
- Category: Snack
- Method: Air Frying
- Cuisine: Brazilian
- Diet: Low Fat
Ingredients
Filling
- 1 medium chicken breast (200–250 g / 7–9 oz)
- ½ small onion, finely chopped (40 g / 1.5 oz)
- 1 garlic clove, minced
- 1 tsp olive oil (5 ml)
- 1 bay leaf (optional)
- 1 tbsp tomato paste (15 g / 0.5 oz, optional)
- 2 tbsp cream cheese (30 g / 1 oz, Catupiry or similar)
- 1 tbsp parsley or green onion, chopped (5 g)
- Salt and black pepper to taste
Dough
- 1 ½ cups chicken broth (375 ml), reserved from cooking chicken
- 1 ½ cups all-purpose flour (190 g / 6.7 oz)
- 1 tbsp butter (14 g / 0.5 oz)
- Pinch of salt
Coating
- 1 egg, beaten
- Cooking spray or a little oil for brushing
- 1 ¼ cups breadcrumbs (125 g / 4.5 oz, panko preferred)
Instructions
- Cook the chicken: Place the chicken breast, bay leaf, and water in a pot. Boil until the chicken is fully cooked, around 15-20 minutes. Reserve 1 ½ cups of the broth for the dough and shred the cooked chicken finely.
- Prepare the filling: Heat olive oil in a pan over medium heat. Sauté the finely chopped onion and minced garlic until translucent and fragrant, about 3-4 minutes. Add the shredded chicken, tomato paste if using, and season with salt and pepper. Stir in cream cheese and chopped parsley or green onion, mixing well until creamy and combined. Remove from heat and set aside.
- Make the dough: In a saucepan, bring the reserved chicken broth, butter, and a pinch of salt to a boil. Reduce heat and add flour all at once, stirring vigorously with a wooden spoon until the dough forms a ball and pulls away from the sides of the pan, about 2-3 minutes. Remove from heat and let cool slightly.
- Shape the coxinhas: Once the dough is cool enough to handle, knead briefly on a clean surface. Pinch off a golf-ball sized piece, flatten it into a disc, place a spoonful of filling in the center, and mold into a teardrop shape, sealing the edges tightly.
- Coat the coxinhas: Dip each shaped dough ball into the beaten egg, then roll thoroughly in the panko breadcrumbs to coat evenly. Spray or brush each with a little oil or cooking spray to aid browning.
- Air-fry the coxinhas: Preheat the air fryer to 375°F (190°C). Arrange the coated coxinhas in the basket in a single layer without overcrowding. Air fry for about 15-18 minutes, turning halfway through, until golden brown and crispy on all sides.
- Serve: Remove from the air fryer and let cool slightly before serving. Enjoy warm as a healthier snack or appetizer option.
Notes
- Using chicken breast keeps the filling lean and healthy.
- Reserving the broth from cooking the chicken for the dough adds flavor and reduces waste.
- Panko breadcrumbs create a lighter, extra-crispy coating perfect for air frying.
- The air fryer method significantly reduces oil usage compared to traditional frying.
- The optional tomato paste and bay leaf add depth to the filling flavor but can be omitted based on preference.
- Serve with a side of hot sauce or ketchup for added zest.