Halloween Chocolate Cookies Recipe
If you’re on the hunt for a spooky twist on a classic treat, this Halloween Chocolate Cookies Recipe is the perfect find. These cookies have that rich, deep chocolate flavor that feels indulgent yet is totally approachable—ideal for baking with friends or whipping up a batch for a festive party. I’ve made these often during the Halloween season, and they always bring the right balance of charm and chocolatey goodness to the table.
What makes this Halloween Chocolate Cookies Recipe stand out is its simplicity paired with versatility. The dough is easy to work with, and you can dress the cookies up however you like—whether it’s a classic powdered sugar dusting or colorful royal icing decorations. Trust me, once you try them, they’ll be your go-to for all your autumn cookie cravings.
Ingredients You’ll Need
These ingredients come together beautifully to create a tender, chocolaty cookie that’s not too sweet but packs a punch in flavor. A little tip before you start: be sure to spoon and level your flour rather than scooping to keep that texture just right!
- All-purpose flour: The sturdy base for these cookies. Using flour that’s spooned and leveled helps avoid dense cookies.
- Unsweetened natural cocoa powder: This gives that deep chocolate taste. I like natural cocoa for its sharpness, but Dutch-processed works if you prefer a smoother flavor.
- Baking powder: Just enough to give the cookies a slight lift without losing their chewy charm.
- Salt: A pinch to balance the sweetness and enhance the chocolate flavor.
- Unsalted butter: Softened to room temperature so it blends nicely—don’t rush this step or you might get lumps.
- Granulated sugar: For that classic sweetness and slight crisp on the edges.
- Large egg: Helps bind everything together and adds moisture.
- Pure vanilla extract: Just a splash to round out the flavor with warm, familiar notes.
- Royal Icing or Easy Cookie Icing (optional): Great for adding fun Halloween decorations. Gel food coloring can tint your icing for spooky effects.
Variations
I love making this Halloween Chocolate Cookies Recipe my own by swapping out add-ins or changing toppings—it keeps things fresh and fun! Feel free to experiment, because every variation shines in its own way.
- With chocolate chips: Adding semi-sweet or white chocolate chips gives an extra burst of melty goodness. I’ve found it adds lovely texture and surprise bites.
- Spiced cookies: A dash of cinnamon or pumpkin pie spice really amps up the fall vibes—perfect if you want a little warmth in every bite.
- Gluten-free option: Swap the all-purpose flour with a gluten-free blend. Just ensure your blend includes xanthan gum for the best structure.
- Nutty twist: Toss in some chopped pecans or walnuts for crunch and earthiness. I like these especially when serving the cookies at home for an afternoon treat.
- Vegan version: Use plant-based butter and an egg substitute like flaxseed “egg” to make it vegan-friendly without losing texture.
How to Make Halloween Chocolate Cookies Recipe
Step 1: Mix Dry Ingredients
Start by whisking together the all-purpose flour, cocoa powder, baking powder, and salt in a medium bowl. Doing this ensures everything is evenly distributed, so your cookies have that consistent chocolate flavor in every bite. I like to sift the cocoa and flour here to prevent lumps—makes a smoother dough!
Step 2: Cream Butter and Sugar
In a separate large bowl, beat the softened butter and granulated sugar on medium speed until light and fluffy—usually about 3 to 5 minutes. This step’s crucial for that tender crumb in your cookies. If your butter is too cold, it won’t whip properly, so plan ahead and let it warm up.
Step 3: Add Egg and Vanilla
Beat in the large egg and vanilla extract until fully combined. The dough might look a little loose at this point, but that’s okay. This step hydrates and adds richness to your batter, setting you up for great texture later.
Step 4: Combine Wet and Dry Ingredients
Slowly add the dry ingredients to the butter mixture, mixing on low speed just until everything comes together. Avoid overmixing, or your cookies can turn out tough. The dough will be soft—if it’s too sticky to handle, sprinkle a little extra cocoa powder on your hands and work surface.
Step 5: Shape and Bake
Roll the dough into 1-inch balls, then roll each ball in cocoa powder for a dramatic effect and a non-sticky finish. Place the cookies about 2 inches apart on a parchment-lined baking sheet. Bake in a preheated 350°F (175°C) oven for 10 to 12 minutes until the cookies are set but still soft in the center. Resist the urge to overbake—these cookies keep their fudgy nature best when pulled out right on time.
Step 6: Cool and Decorate
Once baked, let the cookies cool on the tray for 5 minutes before transferring them to a wire rack to cool completely. If you want, now’s the time to have fun decorating with royal icing or easy cookie icing tinted in Halloween hues. I always enjoy this step with my kids—it’s the perfect way to add personality to the batch.
How to Serve Halloween Chocolate Cookies Recipe

Garnishes
I like to keep garnishes simple yet seasonal. A light dusting of powdered sugar can mimic a spooky “ghost dusting,” or you can pipe on jack-o’-lantern faces with orange and black royal icing for that fun Halloween vibe. Sprinkles shaped like spiders or bats also add a playful touch if you want extra whimsy.
Side Dishes
When serving these cookies, I love pairing them with a warm glass of spiced apple cider or a rich hot chocolate to double down on the cozy, fall-inspired flavors. They also go surprisingly well alongside a simple pumpkin soup or a creamy chai latte for a seasonal dessert spread.
Creative Ways to Present
One year, I arranged my Halloween Chocolate Cookies on a black platter surrounded by candy corn and mini pumpkins—it made a simple cookie look party-worthy. Stacking cookies with parchment paper between layers in glass jars works great for gifting too. If you want to be playful, decorate each cookie as spooky faces and serve on a platter lined with “cobweb” made from spun sugar or thin icing lines.
Make Ahead and Storage
Storing Leftovers
I store leftover Halloween Chocolate Cookies in an airtight container at room temperature, and they stay moist and tender for up to 5 days. To keep them fresh longer, adding a slice of bread in the container works wonders—it keeps the cookies from drying out thanks to the moisture the bread releases.
Freezing
This recipe freezes beautifully! I usually freeze the cookie dough balls on a baking sheet first, then transfer them to freezer bags. That way, I can bake fresh cookies anytime—just thaw them a bit and pop them in the oven for a few extra minutes. It’s a lifesaver when you want fresh cookies without the fuss.
Reheating
To warm up leftover cookies, I pop them in the microwave for about 10 seconds or in a preheated 300°F oven for 3 to 5 minutes. This refreshes their softness nicely without turning them chewy or dry. Just keep an eye on them so you don’t overdo it!
FAQs
-
Can I use Dutch-process cocoa instead of natural cocoa powder in this Halloween Chocolate Cookies Recipe?
Yes! While natural cocoa powder offers a slightly more acidic and sharper chocolate flavor, Dutch-process cocoa is less acidic and provides a mellower taste. You can use either in this recipe; just keep in mind that the texture might be a bit different, but either version yields delicious cookies.
-
How do I prevent my Halloween Chocolate Cookies from spreading too much during baking?
Make sure your butter is just softened but not melting or overly warm when mixing. Also, chilling the dough for 30 minutes before rolling and baking can help the cookies hold their shape better. Using parchment paper and giving enough space between cookies also assists with even baking.
-
Can I decorate these cookies with regular frosting instead of royal icing?
You can, but regular frosting tends to be softer and may not hold designs as well, especially in warmer conditions. Royal icing dries hard, making it better for detailed decorations and stacking. If you prefer a softer topping, try using a thick cream cheese frosting but plan to serve the cookies soon after decorating.
-
How do I store decorated Halloween Chocolate Cookies without ruining the icing?
Allow your decorated cookies to dry completely—usually several hours or overnight—before storing. Then, store them in a single layer in an airtight container, separating layers with parchment paper to protect the icing. Keep the container in a cool, dry place away from direct sunlight.
Final Thoughts
This Halloween Chocolate Cookies Recipe is one I always reach for when I want a simple but flavorful bake that lets me get creative with spooky decorations. They strike the perfect balance between chewy and fudgy, making them irresistible to both kids and grown-ups. Give this recipe a try—I promise it will brighten up your Halloween celebrations and have everyone asking for more!
PrintHalloween Chocolate Cookies Recipe

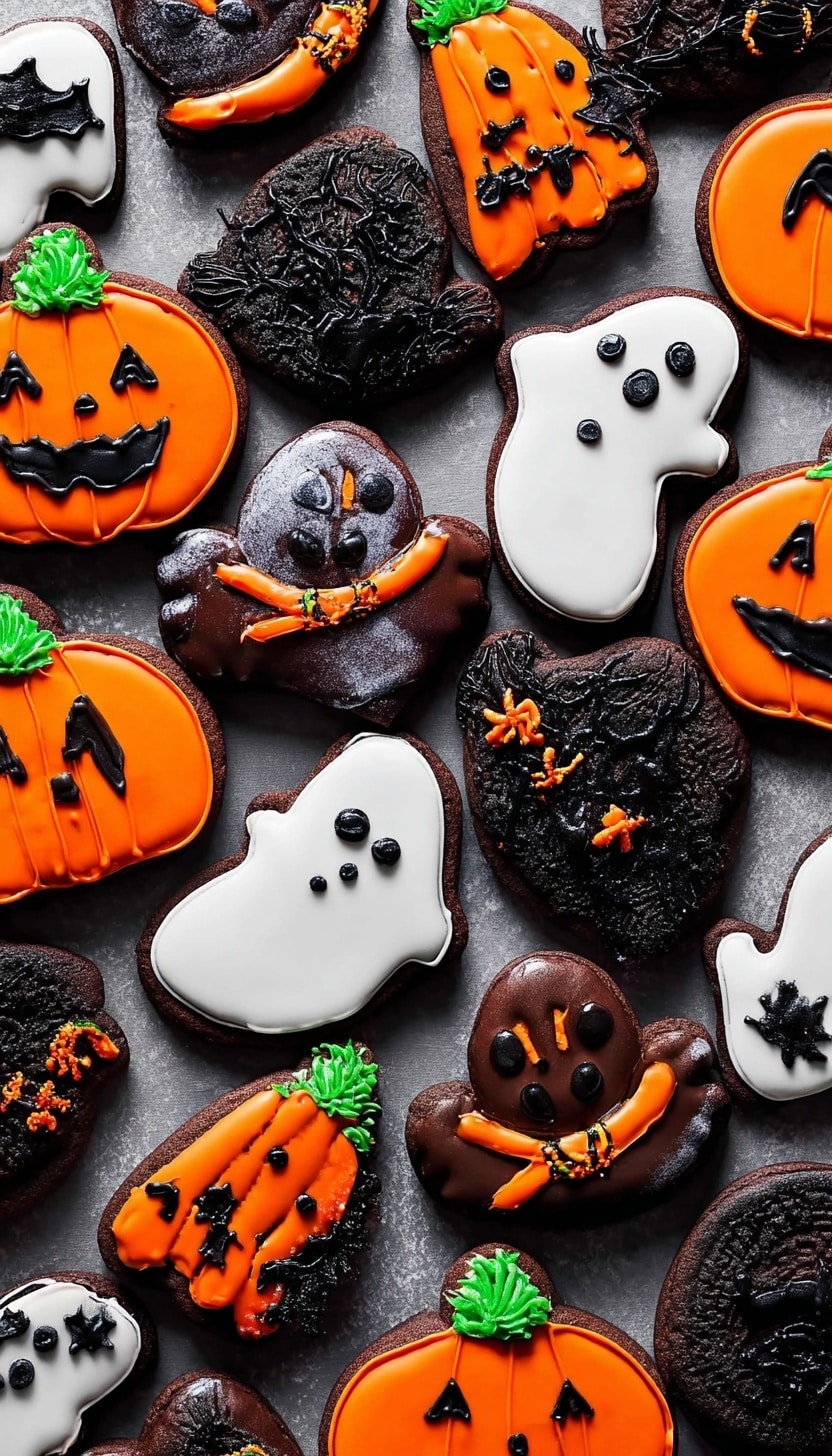
These Halloween Chocolate Cookies are rich, fudgy, and intensely chocolatey, perfect for celebrating the spooky season. Made with natural cocoa powder and a tender buttery base, these cookies have a soft yet slightly chewy texture. Roll them in cocoa powder before baking for an extra chocolate kick and a dramatic dark appearance. Decorate with royal icing or easy cookie icing tinted with gel food coloring to create fun Halloween-themed designs such as spiders, pumpkins, and bats.
- Prep Time: 15 minutes
- Cook Time: 12 minutes
- Total Time: 27 minutes
- Yield: About 24 cookies
- Category: Dessert
- Method: Baking
- Cuisine: American
Ingredients
Cookie Dough
- 1 and 1/2 cups (188g) all-purpose flour (spooned & leveled)
- 3/4 cup (62g) unsweetened natural cocoa powder (or dutch process cocoa powder), plus more as needed for rolling and work surface
- 1 teaspoon baking powder
- 1/8 teaspoon salt
- 3/4 cup (12 Tbsp; 170g) unsalted butter, softened to room temperature
- 1 cup (200g) granulated sugar
- 1 large egg, at room temperature
- 1 teaspoon pure vanilla extract
Optional Decoration
- Royal Icing or Easy Cookie Icing
- Gel food coloring for tinting icings
Instructions
- Combine Dry Ingredients: In a medium bowl, whisk together the all-purpose flour, unsweetened cocoa powder, baking powder, and salt until evenly mixed to ensure consistent flavor and texture throughout the dough.
- Cream Butter and Sugar: In a large mixing bowl, use a hand mixer or stand mixer to beat the softened unsalted butter and granulated sugar together on medium speed until light and fluffy, usually about 3 to 5 minutes. This step helps incorporate air into the dough for a tender crumb.
- Add Egg and Vanilla: Beat in the large room temperature egg and pure vanilla extract until fully incorporated and the mixture is smooth and glossy.
- Mix Dry Ingredients into Wet: Gradually add the dry ingredient mixture to the wet ingredients, mixing on low speed until just combined. Avoid overmixing to keep cookies tender.
- Shape Cookies: Sprinkle some cocoa powder generously on your work surface. Scoop out portions of dough and roll each piece into a small ball. Roll the balls in cocoa powder to coat the outside completely, which creates an attractive dark crust and prevents sticking.
- Prepare for Baking: Place the cocoa-coated dough balls on a baking sheet lined with parchment paper or a silicone baking mat, spacing them about 2 inches apart to allow for spreading.
- Bake Cookies: Preheat your oven to 350°F (177°C). Bake the cookies for 10 to 12 minutes until they are set around the edges but still soft in the center. Avoid overbaking to keep their fudgy texture.
- Cool Cookies: Remove the baking sheet from the oven and let the cookies cool on the pan for 5 minutes before transferring them to a wire rack to cool completely.
- Decorate (Optional): Once cooled, decorate the cookies with royal icing or easy cookie icing tinted with gel food coloring to create Halloween-themed designs such as pumpkins, ghosts, and spiders.
Notes
- Use room temperature egg and butter for better mixing and richer texture.
- If you prefer, you can substitute dutch process cocoa powder for the natural cocoa powder without changing the baking process.
- For extra chocolate intensity, dust cookies lightly with additional cocoa powder immediately after baking.
- Store cookies in an airtight container at room temperature for up to 5 days.
- Royal icing needs to dry completely before stacking or storing decorated cookies to avoid smudging.