Easy Garlic Butter Dinner Rolls Recipe
If you’re craving something soft, buttery, and packed with garlicky goodness, this Easy Garlic Butter Dinner Rolls Recipe is going to be your new favorite. I remember making these for a cozy family dinner, and honestly, it felt like a small celebration every time we pulled these golden rolls fresh from the oven. They’re just the right balance of fluffy and flavorful, with that irresistible garlic butter that keeps you coming back for more.
What makes these rolls so worth trying is how easy they are to pull together, even if you don’t usually bake bread. The dough is forgiving and the garlic butter glaze? Absolute magic. Whether you’re serving them alongside a hearty stew or simply enjoying them warm straight out of the pan, these rolls will quickly become your go-to recipe for dinner parties, holidays, or even a casual weeknight.
Ingredients You’ll Need
These ingredients all work together beautifully to create soft, fluffy rolls bursting with flavor. One tip: make sure your milk is warm but not hot to help the yeast do its job without killing it. Here’s what you’ll need:
- Whole milk: Warm milk helps activate the yeast and adds a touch of richness.
- Active dry yeast or instant yeast: Either works, but make sure it’s fresh for the best rise.
- Sugar: Just enough to feed the yeast and add a hint of sweetness.
- All purpose flour: The backbone of your dough, providing structure and softness.
- Large egg: Adds moisture, richness, and helps bind the dough.
- Salt: Essential for flavor balance.
- Unsalted butter (softened): For tender, buttery rolls straight in the dough.
- Egg yolk and milk (for egg wash): Gives your rolls that beautiful golden shine.
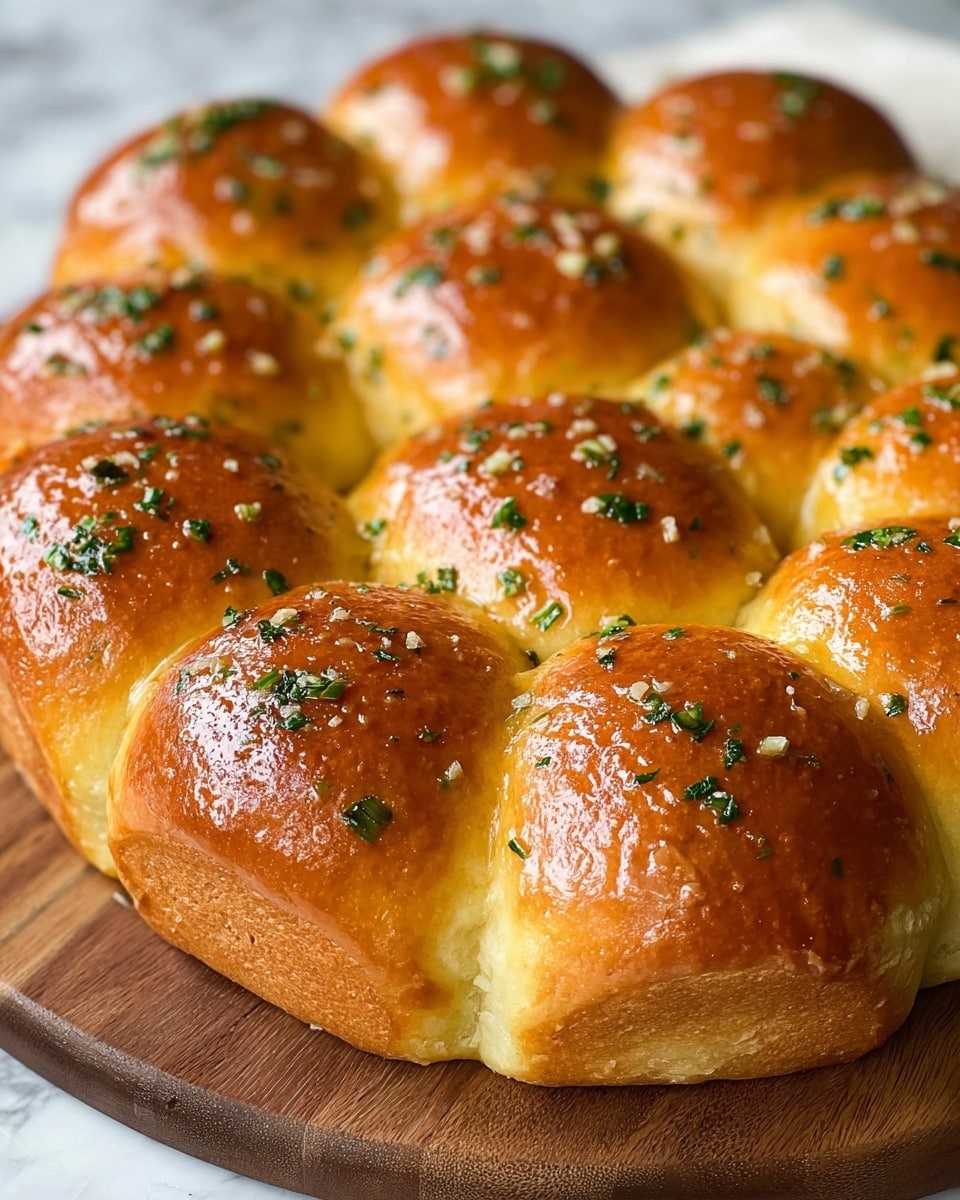
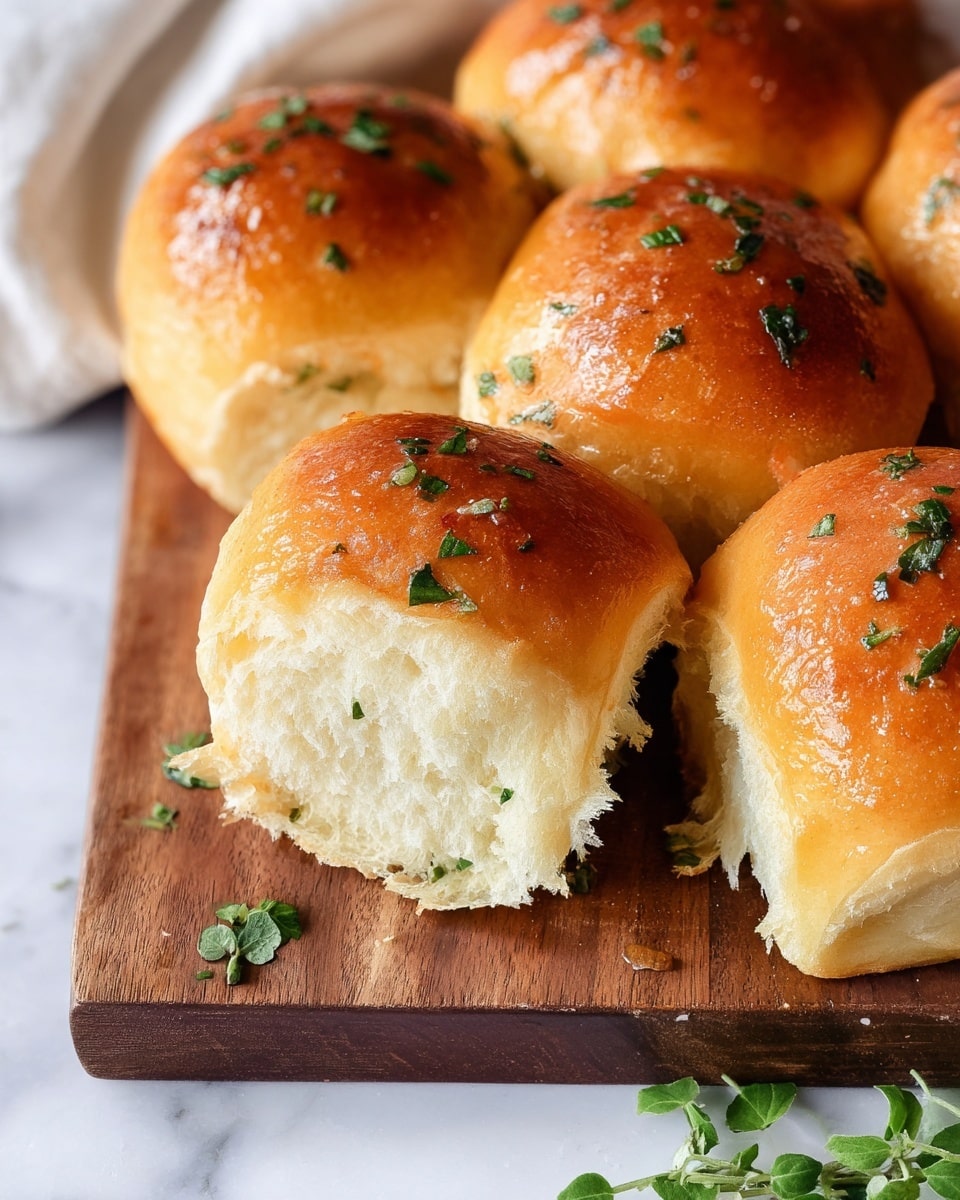
- Salted butter (for garlic butter): The hero of the garlic butter topping.
- Garlic cloves (finely chopped): Fresh garlic brings that punch of aroma and flavor.
- Freshly chopped parsley: Adds color, freshness, and a mild herbal note.
Variations
I love making these rolls my own depending on the occasion. Mix it up to match your mood or dietary needs — the core dough is versatile enough to welcome lots of tweaks!
- Herbed garlic butter: I’ve tossed in rosemary or thyme freshly chopped alongside the parsley for an earthy twist that’s perfect for fall dinners.
- Whole wheat flour: Swap half the all-purpose flour with whole wheat for a nuttier, heartier roll without losing softness.
- Vegan version: Replace butter with plant-based margarine and the egg with a flax egg — you’ll still get delicious rolls with a slightly different texture.
- Cheesy garlic rolls: After shaping the dough, I sometimes sprinkle shredded mozzarella inside or on top before baking for an extra indulgence.
How to Make Easy Garlic Butter Dinner Rolls Recipe
Step 1: Activate the yeast and mix your dough
Start by warming your milk to about 110°F—warm enough to feel cozy but not hot to the touch. Sprinkle your yeast and sugar into the milk, give it a gentle stir, and let it sit for 5-10 minutes until it’s bubbly and foamy. This means the yeast is alive and kicking. While waiting, grab a large mixing bowl and whisk together the egg, softened butter, and salt. Once the yeast is foamy, add it to the egg mixture, then start adding in your flour gradually. If you’re mixing by hand, stir until it begins forming a shaggy dough.
Step 2: Knead until smooth and elastic
Transfer the dough onto a clean, floured surface and knead for about 8-10 minutes. What you’re looking for is a dough that feels smooth and bounces back when you poke it gently. If you have a stand mixer with a dough hook, this is even easier and faster. I like to add touches of flour if it gets too sticky, but be careful — too much flour and your rolls will turn out dense.
Step 3: Let the dough rise
Place your kneaded dough in a lightly greased bowl, cover it with a damp cloth or plastic wrap, and tuck it away in a warm spot. I usually let mine rise for about 1 to 1.5 hours, until it doubles in size. This first rise is crucial for that soft crumb we’re aiming for.
Step 4: Shape and second rise
Punch the dough down gently and divide it into 12 equal pieces—this makes perfect dinner rolls. Shape each into a smooth ball and arrange them in a greased baking pan just touching each other; this creates beautiful pull-apart rolls. Cover again and let rise for another 30-45 minutes until puffy.
Step 5: Bake and brush with garlic butter
Preheat your oven to 350°F (175°C). Before baking, give the rolls an egg wash made with egg yolk and milk to add that golden glow. Bake for 20-25 minutes or until you see a gorgeous golden brown. While they bake, melt your salted butter and gently sauté the finely chopped garlic just until fragrant — a quick step to soften the garlic’s bite and deepen its flavor. As soon as your rolls are out of the oven, brush them generously with this warm garlic butter and sprinkle with fresh parsley. Trust me, this final touch is what makes these Easy Garlic Butter Dinner Rolls Recipe truly unforgettable.
How to Serve Easy Garlic Butter Dinner Rolls Recipe
Garnishes
I often sprinkle a bit more fresh parsley on top right before serving, sometimes even a pinch of flaky sea salt for contrast. If you’re feeling festive, a light drizzle of extra virgin olive oil or a sprinkle of Parmesan cheese on the buttered tops adds an extra touch of yum.
Side Dishes
These rolls pair wonderfully with soups like tomato basil or creamy mushroom, and they’re perfect alongside hearty mains like roast chicken, beef stew, or even pasta dishes. For casual meals, I love serving them with a simple salad and a bowl of warm chili to soak up every bit of juice.
Creative Ways to Present
For special occasions, I like to arrange the rolls in a circular pattern in a round pan, so once baked, it’s easy to pull each roll apart. You can also bake them in mini muffin tins for individual servings — great for parties and they look adorable garnished with little sprigs of parsley.
Make Ahead and Storage
Storing Leftovers
I store leftover rolls wrapped tightly in plastic wrap at room temperature for up to 2 days. This keeps them soft and moist – if you find they’ve started to dry out a bit, a quick few seconds in the microwave wrapped in a damp paper towel brings them back beautifully.
Freezing
To freeze, I prefer to bake the rolls fully, let them cool completely, then wrap individually or in small batches with plastic wrap and place them in a freezer bag. They freeze like a charm and will keep for up to 3 months. When you want a warm roll, thaw overnight in the fridge or on the counter for a few hours.
Reheating
Reheat rolls in a 325°F oven for about 10 minutes, wrapped loosely in foil to keep moisture intact. If you want to revive the garlic butter flavor, melt a little more butter with garlic and brush it on right before serving — extra indulgence always wins!
FAQs
-
Can I use quick-rise yeast in this Easy Garlic Butter Dinner Rolls Recipe?
Yes! Quick-rise yeast can speed up the rising time, so just keep an eye on your dough as it may be ready sooner than the times mentioned here. The texture and flavor will stay just as delicious.
-
How do I make these rolls dairy-free?
You can easily swap the milk for any plant-based milk like almond or oat, and replace both kinds of butter with vegan margarine or coconut oil. Use a flax egg or another egg replacer to keep the dough binding properly.
-
Can I prepare the dough the night before?
You sure can! After kneading, cover the dough tightly and let it rise slowly in the fridge overnight. Just take it out to warm up and perform the second rise before baking the next day.
-
What should I do if my dough is too sticky?
Dust your hands and work surface lightly with flour, and knead in small amounts until the dough becomes smooth and less sticky. Avoid adding too much flour, or the rolls may become dense rather than light and airy.
Final Thoughts
This Easy Garlic Butter Dinner Rolls Recipe really holds a special place in my kitchen favorites. They have this wonderful way of bringing people together — the smell alone can turn any moment into something cozy and comforting. I hope once you try these, you’ll find them as simple and rewarding as I do, and they’ll make countless meals that much better.
PrintEasy Garlic Butter Dinner Rolls Recipe

These Easy Garlic Butter Dinner Rolls are soft, fluffy, and rich with a delicious garlic butter glaze. Perfect as a side for any meal, these homemade rolls combine a tender crumb with a savory garlic-parsley butter topping for an irresistible flavor.
- Prep Time: 20 minutes
- Cook Time: 20 minutes
- Total Time: 2 hours 15 minutes
- Yield: 12 dinner rolls
- Category: Baking
- Method: Baking
- Cuisine: American
- Diet: Vegetarian
Ingredients
Dinner Rolls
- 1 cup whole milk (240g), warm (around 110°F)
- 3 teaspoons active dry yeast or instant yeast
- ⅓ cup sugar (70g)
- 3 ¾ cups all-purpose flour (490g)
- 1 large egg
- 1.5 teaspoons salt
- 6 tablespoons unsalted butter, softened at room temperature (85g)
- Egg wash: 1 egg yolk and 1 tablespoon milk
Garlic Butter
- ¼ cup salted butter (57g)
- 2-3 garlic cloves, finely chopped
- 1-2 tablespoons freshly chopped parsley
Instructions
- Activate the yeast: Warm the milk to around 110°F (warm but not hot), then stir in the yeast and 1 tablespoon of the sugar. Let it sit for 5-10 minutes until it becomes frothy, indicating that the yeast is active.
- Mix the dough: In a large bowl, combine the flour, remaining sugar, and salt. Add the softened butter, the activated yeast mixture, and the egg. Mix everything together until a dough forms.
- Knead the dough: Turn the dough out onto a floured surface and knead for about 8-10 minutes until smooth and elastic. Alternatively, knead in a stand mixer with a dough hook.
- First rise: Place the dough in a greased bowl, cover it with a damp cloth or plastic wrap, and let it rise in a warm spot for about 1 to 1.5 hours, or until it doubles in size.
- Shape the rolls: Punch down the dough gently to release air. Divide it into 12 equal pieces and shape each into a smooth ball. Place the rolls in a greased baking dish or on a baking sheet, spaced slightly apart.
- Second rise: Cover the shaped rolls and let them rise again for 30-45 minutes until puffy.
- Preheat oven and prepare egg wash: Preheat your oven to 375°F (190°C). Prepare the egg wash by whisking together the egg yolk and milk.
- Apply egg wash and bake: Brush the rolls gently with the egg wash to give them a golden, shiny finish. Bake in the preheated oven for 18-22 minutes until golden brown.
- Make garlic butter: While the rolls bake, melt the salted butter in a small saucepan or microwave, then stir in the finely chopped garlic and freshly chopped parsley.
- Brush with garlic butter: As soon as the rolls come out of the oven, brush them generously with the warm garlic butter mixture to infuse them with flavor and keep them moist.
- Serve warm: Let the rolls cool slightly, then serve warm for the best taste and texture.
Notes
- Make sure the milk is not too hot to avoid killing the yeast.
- For softer rolls, you can add a tablespoon of honey or swap half the flour with bread flour.
- Store leftover rolls in an airtight container to keep them fresh for 2-3 days.
- Reheat rolls by wrapping them in foil and warming in the oven for a few minutes.
- You can adjust the garlic amount to your preference or omit parsley if unavailable.