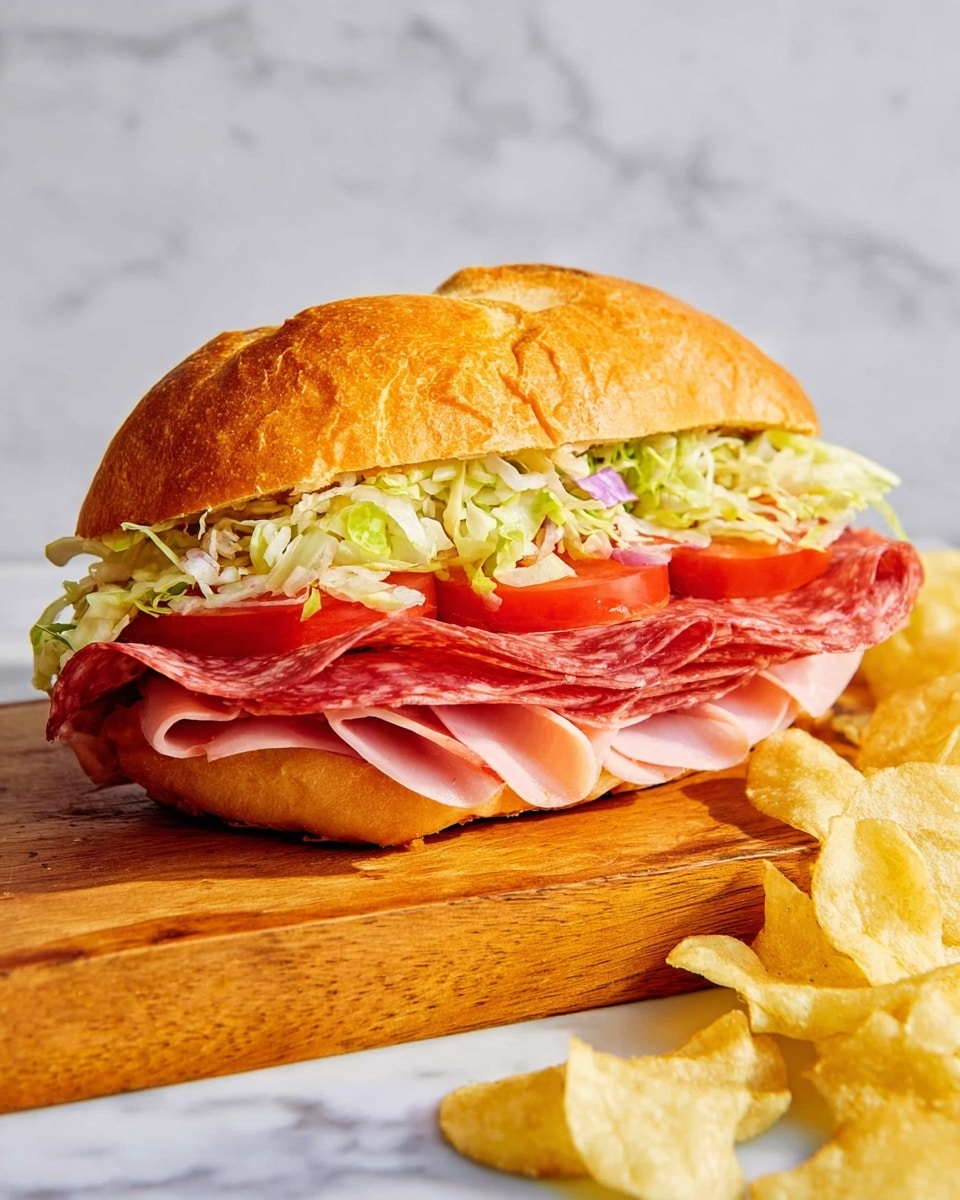
Baked Italian Grinder Sandwiches Recipe
If you’re looking for a sandwich that takes all the delicious flavors of an Italian deli and transforms them into a warm, gooey, comforting delight, then I can’t recommend this Baked Italian Grinder Sandwiches Recipe enough. It’s one of those recipes that became a weekend obsession for me, especially when friends drop by unexpectedly or when I want something that feels like a real treat without too much fuss.
The magic here is in the layering of classic Italian meats, cheeses, and vibrant veggies, all tucked inside a crusty sub roll, brushed with a flavorful herb butter, and then baked to melting perfection. I’ve found it’s a fantastic recipe for game days, casual dinners, or even a fun lunch, and once you try it, it will become one of your go-to crowd-pleasers too.
Ingredients You’ll Need
These ingredients work in perfect harmony to give you that classic Italian grinder flavor with an irresistible baked twist. When you shop, try to pick fresh deli slices and quality breads because they really make or break the sandwich.
- Italian sub rolls: Pick firm, crusty rolls that hold up well in the oven without going soggy.
- Unsalted butter: Melting this and mixing it with herbs brings rich flavor and keeps the sandwich moist as it bakes.
- Garlic powder: A simple way to add that savory punch without overpowering the other spices.
- Onion powder: Adds a subtle sweetness and depth to the herb butter blend.
- Dried oregano and dried basil: These classic Italian herbs make all the difference in recreating that authentic grinder taste.
- Red pepper flakes: Just enough heat to tickle your taste buds without overwhelming the whole sandwich.
- Salt and black pepper: Essential for balancing all the flavors.
- Deli-sliced salami, ham, pepperoni: The trio that brings the hearty, savory, and mildly spicy notes.
- Deli-sliced mozzarella and provolone cheese: Creamy, melting cheese is the soul of a baked grinder.
- Grated Parmesan cheese: A final cheesy touch that crisps up deliciously on top.
- Roasted red peppers, black olives, banana peppers: These veggies add color, tang, and complexity in every bite.
- Fresh basil leaves: For that fresh, aromatic pop right before serving.
Variations
I love making this Baked Italian Grinder Sandwiches Recipe my own depending on the season and who’s joining me at the table. Don’t be afraid to customize it to your liking—after all, a great grinder is all about layering flavors you enjoy.
- Vegetarian version: Replace the meats with grilled veggies like zucchini, eggplant, and mushrooms and use extra cheese. I tried this once for a friend who doesn’t eat meat, and even the carnivores didn’t miss the meat!
- Spicy upgrade: Add more red pepper flakes or a dash of hot sauce before baking if you like it fiery. This kicks the flavor up and wakes up your palate instantly.
- Gluten-free: Sub the rolls for gluten-free bread or buns and you’re set—just watch your baking time as smaller buns might toast faster.
- Different cheeses: Experiment with smoked provolone or even a sharp cheddar for a twist. Mozzarella is dreamy, but sometimes I swap in gouda for a smoky warmth.
How to Make Baked Italian Grinder Sandwiches Recipe
Step 1: Prep the Herbed Butter
Start by melting the unsalted butter in a small bowl. Then stir in the garlic powder, onion powder, dried oregano, dried basil, red pepper flakes, salt, and black pepper. This buttery mixture is what transforms a simple sandwich into that irresistible baked delight. Trust me, don’t skip this step—it’s like a flavor hug for the bread!
Step 2: Slice and Butter the Rolls
Slice your Italian rolls lengthwise but not all the way through—think of opening a book. Generously brush the inside of each roll with the herbed butter mixture. This will soak into the bread and crisp up beautifully when baked.
Step 3: Layer the Meats, Cheeses, and Veggies
Now comes the fun part—layer your deli-sliced salami, ham, and pepperoni evenly along the length of the roll. Top these with the mozzarella and provolone cheese slices, then scatter roasted red peppers, black olives, banana peppers, and fresh basil leaves on top. Don’t be shy with the fillings; these sandwiches are meant to be generous!
Step 4: Add Parmesan and Bake
Sprinkle grated Parmesan cheese over the top of your layered sandwich. Close the roll, and if you like, give the outside another light brush of the butter mixture to get a golden crust. Wrap the whole thing in foil, pop it on a baking sheet, and bake at 350°F (175°C) for about 20 to 25 minutes. You’re aiming for melty cheese and heated-through fillings—avoid overbaking to keep the bread soft inside while crisply golden outside.
How to Serve Baked Italian Grinder Sandwiches Recipe

Garnishes
I like to finish my grinders with a handful of fresh basil leaves for that bright, herbaceous note. Sometimes I drizzle a little extra virgin olive oil or sprinkle on some crushed red pepper flakes if friends like a kick. A few pickles on the side never hurt either!
Side Dishes
When I serve these sandwiches, I often pair them with simple sides like crispy kettle chips, a fresh garden salad, or even a cup of tomato basil soup. The warm, cheesy grinder and a soothing soup make a combo that feels like the ultimate comfort meal.
Creative Ways to Present
For parties, I’ve made mini baked Italian grinder sliders using small rolls and arranged them on a big platter with toothpicks holding them together. They’re perfect finger food and always disappear fast! Another idea is cutting the sandwich diagonally and stacking the halves for an impressive sandwich tower that’s as fun to look at as it is to eat.
Make Ahead and Storage
Storing Leftovers
I usually wrap leftover sandwiches tightly in foil or plastic wrap and store them in the fridge for up to 2 days. Reheating gently in the oven keeps the bread nicely crisped while melting the cheese again. Avoid microwaving if you want to save that fresh-baked texture!
Freezing
While I haven’t frozen the whole sandwich baked, I’ve wrapped the unbaked, assembled sandwich tightly in foil and frozen it safely for a couple of weeks. Bake it straight from the freezer, just add about 10 extra minutes baking time. It’s a great trick when you want dinner ready for busy nights.
Reheating
My go-to way to reheat leftover baked Italian grinders is in a 350°F oven, wrapped in foil, for about 10 to 12 minutes. This warms the filling evenly without drying out the bread. If you like a crunchier crust, unwrap it during the last couple of minutes.
FAQs
-
Can I use different types of bread instead of Italian sub rolls?
Absolutely! While Italian sub rolls are ideal because they hold up well when baked, you can use other sturdy breads like hoagie rolls or even baguettes. Just keep in mind that softer breads might get soggy faster, so adjust baking time accordingly to achieve the desired crustiness.
-
What’s the best way to prevent the sandwich from getting soggy?
Brushing the rolls generously with herbed melted butter helps create a barrier that keeps moisture out. Also, baking the sandwiches wrapped in foil traps heat and melts the cheese while keeping the bread from drying out. If you’re adding veggies with high water content, like tomatoes, consider adding them fresh after baking instead.
- Can I prepare these sandwiches ahead of time?
Yes! You can assemble the sandwiches a few hours ahead or even the day before, then wrap tightly and refrigerate. When it’s time to eat, just bake them as directed. This makes entertaining super easy and stress-free.
- How spicy is this recipe?
The recipe has a mild heat thanks to the red pepper flakes, but if you prefer it less spicy, you can reduce or omit them. For those who love spice, feel free to add extra flakes or hot sauce. It’s all about adjusting to your taste buds.
- Can I make this recipe vegetarian?
Definitely! Swap out the salami, ham, and pepperoni for grilled or roasted veggies, and add extra cheese or even some marinated artichoke hearts for flavor. It’s a delicious alternative that still captures the essence of an Italian grinder.
Final Thoughts
This Baked Italian Grinder Sandwiches Recipe has become one of those comforting dishes that I always have up my sleeve for both casual nights and when guests come over unexpectedly. It’s reliably delicious, easy to make, and lets you enjoy those classic Italian flavors in the best way possible—warm, melty, and packed with flavor. Give it a try, and I promise you’ll keep coming back to it, just like I do.
PrintBaked Italian Grinder Sandwiches Recipe

These Baked Italian Grinder Sandwiches are a deliciously hearty and flavorful meal, featuring layers of classic Italian deli meats, cheeses, and vibrant veggies baked inside crusty Italian sub rolls and seasoned with a savory herb butter. Perfect for a crowd or a satisfying family dinner, these sandwiches combine melty cheese, zesty peppers, and aromatic herbs for an irresistible Italian-inspired meal.
- Prep Time: 10 minutes
- Cook Time: 20 minutes
- Total Time: 30 minutes
- Yield: 4 sandwiches
- Category: Main Course
- Method: Baking
- Cuisine: Italian-American
Ingredients
Bread and Butter Mixture
- 1 loaf Italian sub rolls
- 1/2 cup unsalted butter, melted
- 1 tablespoon garlic powder
- 1 tablespoon onion powder
- 1 tablespoon dried oregano
- 1 tablespoon dried basil
- 1 teaspoon red pepper flakes
- 1/2 teaspoon salt
- 1/4 teaspoon black pepper
Meats and Cheeses
- 1/2 pound deli-sliced salami
- 1/2 pound deli-sliced ham
- 1/2 pound deli-sliced pepperoni
- 1/2 pound deli-sliced mozzarella cheese
- 1/2 pound deli-sliced provolone cheese
- 1/4 cup grated Parmesan cheese
Veggies and Garnishes
- 1/4 cup roasted red peppers, sliced
- 1/4 cup sliced black olives
- 1/4 cup banana peppers, sliced
- 1/4 cup fresh basil leaves
Instructions
- Preheat the Oven: Preheat your oven to 350°F (175°C) to ensure it’s ready for baking the sandwiches to a perfect golden finish.
- Prepare Herb Butter: In a small bowl, mix the melted unsalted butter with garlic powder, onion powder, dried oregano, dried basil, red pepper flakes, salt, and black pepper until well combined.
- Slice the Roll: Carefully slice the Italian sub roll horizontally, without cutting all the way through, so the sandwich holds together during baking.
- Layer Meats and Cheeses: Starting with the bottom half, layer the salami, ham, and pepperoni evenly across the bread. Follow with layers of mozzarella and provolone cheese.
- Add Vegetables and Garnishes: Sprinkle the roasted red peppers, sliced black olives, banana peppers, and fresh basil leaves evenly over the cheese layer.
- Top with Parmesan: Sprinkle the grated Parmesan cheese over the fillings for an extra cheesy, savory finish.
- Brush with Herb Butter: Generously brush the prepared herb butter over the top and bottom of the bread to add flavor and ensure a crispy baked crust.
- Wrap and Bake: Wrap the sandwich tightly in aluminum foil to hold everything together and bake in the preheated oven for about 15-20 minutes, or until the cheese is melted and the sandwich is heated through.
- Serve: Remove the foil carefully, slice the sandwich into portions, and serve warm for a satisfying meal.
Notes
- You can customize the sandwich by adding other Italian meats or veggies to suit your taste.
- For a crispy crust, you can unwrap the sandwich during the last 5 minutes of baking.
- Use fresh Italian sub rolls for the best texture and flavor.
- Make sure to wrap the sandwich tightly in foil to prevent drying out during baking.
- Leftovers can be stored in the refrigerator and reheated in the oven for best results.