
Thai Fried Chicken Sandwich Recipe
I can’t tell you how much I love this Thai Fried Chicken Sandwich Recipe — it’s one of those dishes that feels both comforting and exciting at the same time. The juicy, marinated chicken thighs soaked in coconut milk and curry flavors bring a vibrant twist to your typical fried chicken sandwich, making it perfect for lunch, dinner, or whenever you need a little flavor boost. This sandwich has become my go-to when I want something a little different but still crave that crispy, golden fried chicken bite.
What makes this Thai Fried Chicken Sandwich Recipe worth trying is how it balances spicy, tangy, and fresh elements all in one bite. From the creamy, slightly spicy sauce to the crisp pickled carrots and fresh herbs, every layer adds a new burst of flavor that keeps me coming back for more. Trust me, once you try it, you’ll want to make it again and again — and I’ve got all the details here so you can nail it in your kitchen without stress.
Ingredients You’ll Need
These ingredients work beautifully together to create a rich, aromatic chicken with a perfectly crisp coating and fresh, vibrant toppings. When shopping, look for fresh herbs and make sure you’ve got good quality coconut milk and Thai chili sauce — they really elevate the sandwich.
- Chicken thighs: I prefer boneless, skinless thighs because they stay juicy and tender after frying.
- Coconut milk: Adds richness and helps tenderize the chicken while giving it that subtle tropical flavor.
- Curry powder: Use a good quality blend for authentic flavor — it’s the heart of the marinade’s spice.
- Garlic and ginger: Fresh is best here; these aromatics punch up the flavor.
- Salt and sugar: A pinch of both keeps the seasoning balanced and enhances the marinade.
- Rice flour or cornstarch: Key for a light, crispy coating — rice flour is my favorite for extra crunch.
- Vegetable oil: You’ll need enough for deep frying; make sure it’s neutral-flavored oil.
- Thai chili sauce: Look for one that’s got a good balance of sweet and heat — this is the zingy sauce that brings everything together.
- Mayonnaise or plain yogurt: I sometimes swap mayo for yogurt if I’m feeling lighter; both mix nicely into the sauce.
- Cucumber: Thinly sliced for freshness and crunch — don’t skip it!
- Pickled carrots: Adds a lovely tang; I like to make my own quick pickles but store-bought work great too.
- Fresh cilantro and Thai basil leaves: These herbs are the real game changers; they add bright, fresh notes that cut through the richness.
- Buns: Soft buns like brioche are my go-to for this sandwich — they soak up the sauce without falling apart.
Variations
One of the things I love about this Thai Fried Chicken Sandwich Recipe is how easy it is to make it your own. I often tweak the sauce or toppings depending on what I have on hand or my mood — and you absolutely should too! Make it your own and have fun with it.
- Spicy kick: I sometimes add extra sriracha or finely chopped fresh chilies to the mayo mixture when I want more heat — works like a charm!
- Healthier version: You can oven-bake the chicken after marinating and breading for a lighter version, though you’ll lose some of that crispy indulgence.
- Veggie-packed: Swap pickled carrots for kimchi or add shredded lettuce for more crunch and flavor.
- Gluten-free: Use rice flour for breading and check your buns to keep it gluten-friendly.
- Extra herbaceous: I sometimes add mint or even a splash of lime juice to the sauce for a brighter, zesty finish.
How to Make Thai Fried Chicken Sandwich Recipe
Step 1: Marinate the Chicken for Maximum Flavor
Start by mixing coconut milk, curry powder, minced garlic, grated ginger, salt, and sugar in a bowl. Pat your chicken thighs dry, then submerge them in this marinade. I like to let them sit for at least 1 hour, but overnight in the fridge is even better — this really tenderizes the meat and infuses those incredible Thai flavors deeply.
Step 2: Prepare the Breading and Heat the Oil
Set up your breading station by placing rice flour (or cornstarch) in a shallow dish and seasoning it lightly with salt and pepper. Pour vegetable oil into a heavy pot or deep fryer and heat it to about 350°F (175°C). Use a thermometer if you have one — maintaining the right temp is key to getting perfectly crispy chicken without greasy sogginess.
Step 3: Coating and Frying the Chicken
Remove the chicken from the marinade, letting excess drip off, then dredge each piece thoroughly in the rice flour mixture. Press lightly so the coating sticks well. Fry in batches to avoid crowding — I usually do 2-3 pieces at a time — and cook for about 5-7 minutes until golden brown and cooked through. Keep an eye on the color and check internal temp if you can; chicken should reach 165°F (74°C).
Step 4: Make the Sauce and Toast the Buns
While your chicken fries, whisk together Thai chili sauce and mayo (or yogurt) until smooth and creamy. This quick sauce adds the perfect spicy-sweet creaminess your sandwich needs. Toast your buns lightly to add a slight crunch and prevent sogginess when you assemble — I like that little contrast of textures.
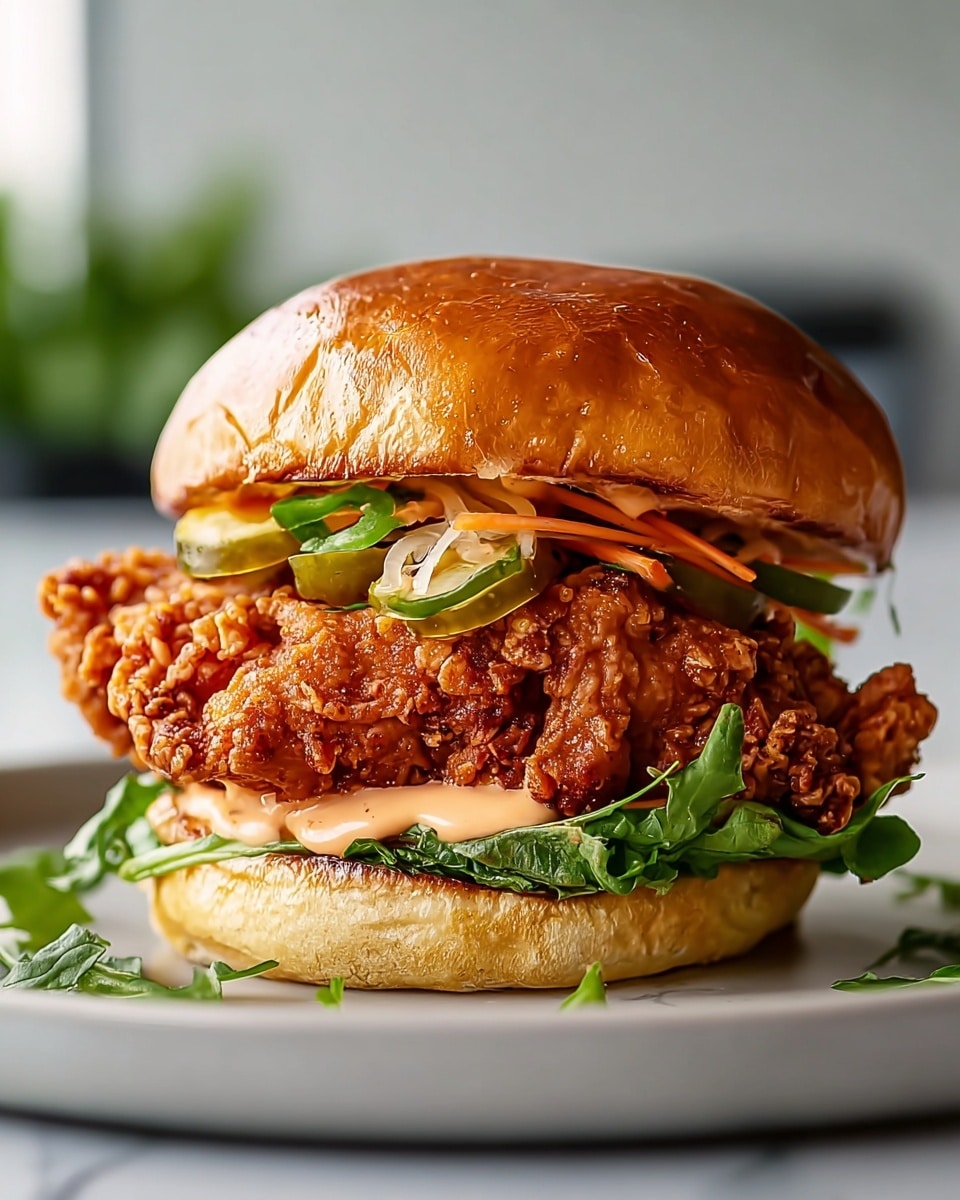
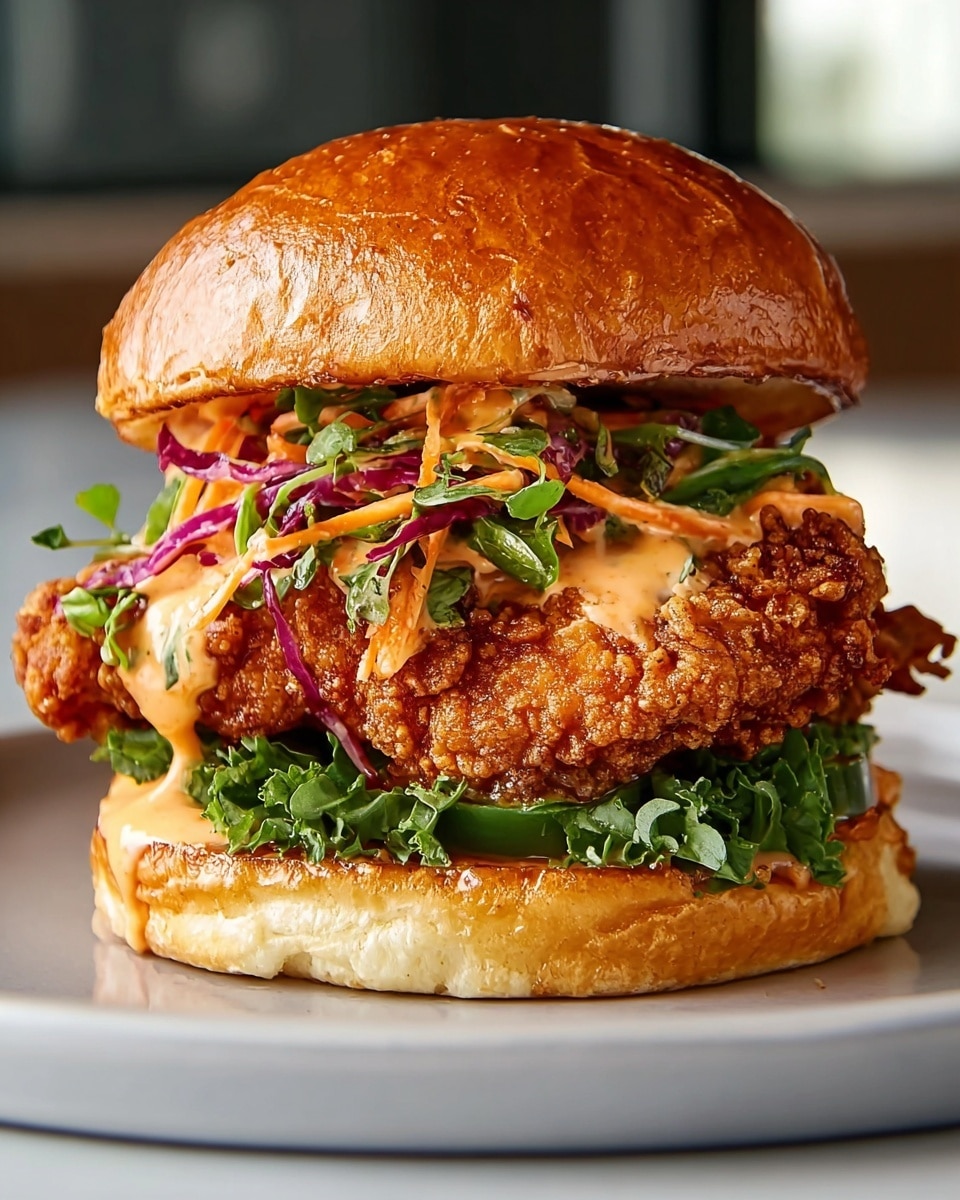
Step 5: Assemble Your Thai Fried Chicken Sandwich
Spread a generous layer of the chili mayo on each bun half. Place the fried chicken thigh on the bottom, then layer on the cucumber slices, pickled carrots, and a handful of fresh cilantro and Thai basil leaves. Top with the bun lid, press lightly, and dive in. Trust me, it’s worth the waiting.
How to Serve Thai Fried Chicken Sandwich Recipe
Garnishes
I love adding fresh cilantro and Thai basil leaves as garnishes because they bring that fresh herbal brightness that cuts through the richness of the fried chicken. A drizzle of extra Thai chili sauce or a squeeze of lime never hurts if you want to amp up the flavor even more. Sometimes I toss on thinly sliced red chilies for a little extra crunch and heat.
Side Dishes
This sandwich pairs beautifully with a simple side of tangy pickled vegetables or a fresh green salad to balance the richness. On lazy weekends, I love pairing it with crispy sweet potato fries or even a small bowl of coconut rice on the side. If you’re craving something fun, a cold Thai iced tea is a perfect companion drink for this meal.
Creative Ways to Present
For special occasions or dinner parties, I like to serve mini versions of this Thai Fried Chicken Sandwich, using small slider buns and a toothpick to keep everything in place. You can also line a platter with banana leaves for an authentic touch and sprinkle chopped peanuts over the top for extra texture and flavor. It’s fun to set up a “build-your-own” sandwich bar with various toppings and sauces so everyone can customize their sandwich experience.
Make Ahead and Storage
Storing Leftovers
I usually store leftover fried chicken in an airtight container in the fridge for up to 3 days. Keep the sauce separate to prevent soggy bread — just add it fresh when you’re ready to eat. When I’m short on time, I prep the marinade and pickled veggies ahead so assembly is a breeze later on.
Freezing
Freezing works great if you want to batch cook. I flash freeze the fried chicken pieces on a baking sheet, then transfer them to a freezer-safe bag. When you’re ready, thaw overnight in the fridge — the key is reheating at a high temperature to bring back that crispy coating!
Reheating
To reheat and keep the crunch, I usually pop the chicken in a hot oven (around 375°F or 190°C) on a wire rack for 10-12 minutes. This way, the heat circulates and crisps up the breading nicely without drying out the meat. Avoid microwaving if you can, since it tends to make the crust soggy.
FAQs
-
Can I make this Thai Fried Chicken Sandwich Recipe with chicken breasts instead of thighs?
Absolutely! Chicken breasts can work fine, but I prefer thighs because they stay juicier and more forgiving during frying. If using breasts, slice them thinner and be careful not to overcook, as they tend to dry out faster.
-
Is coconut milk necessary in the marinade?
Coconut milk adds richness and helps tenderize the chicken, but if you’re allergic or don’t have it, you can substitute with plain yogurt or buttermilk. Just keep in mind it will change the flavor slightly, but still deliver tender, flavorful chicken.
-
How spicy is the sandwich, and can I adjust the heat?
The level of spice mainly comes from the Thai chili sauce. You can control the heat by choosing a milder sauce or adjusting how much you add to the mayo. If you love spice, add extra fresh chilies or sriracha in the sauce for a big kick.
-
What’s the best way to get super crispy fried chicken in this recipe?
Make sure the oil is hot enough (around 350°F/175°C) and don’t overcrowd the frying pot. Using rice flour or cornstarch for breading helps achieve that extra crunchy texture. Also, pat your chicken dry before breading to avoid sogginess.
-
Can I prepare any parts of this Thai Fried Chicken Sandwich Recipe in advance?
Yes! Marinate the chicken and prepare pickled carrots a day ahead — this actually deepens the flavors and makes your cooking day smoother. You can also mix the sauce in advance and keep it chilled until you’re ready to assemble.
Final Thoughts
This Thai Fried Chicken Sandwich Recipe holds a special place in my heart because it’s such a fun way to enjoy bold, fresh flavors without fuss. The balance of spice, sweet, crunchy, and creamy is a total crowd-pleaser that feels both indulgent and homemade. I encourage you to give this recipe a try — I promise you’ll appreciate those crispy thighs layered with fresh herbs and tangy pickled veggies just as much as I do. Cooking it together feels like a little mini-adventure in the kitchen, and every bite is worth it!
PrintThai Fried Chicken Sandwich Recipe

A flavorful Thai Fried Chicken Sandwich combining marinated crispy chicken thighs with a spicy Thai chili mayonnaise, fresh cucumber, pickled carrots, and aromatic herbs, all layered inside a soft toasted bun. Perfect for a delicious fusion meal with a crunchy, spicy, and fresh bite.
- Prep Time: 15 minutes
- Cook Time: 15 minutes
- Total Time: 1 hour 30 minutes (including marinating time)
- Yield: 4 sandwiches
- Category: Sandwiches
- Method: Frying
- Cuisine: Thai
Ingredients
Chicken and Marinade
- 4 boneless, skinless chicken thighs
- 1 cup coconut milk
- 1 tablespoon curry powder
- 3 cloves garlic, minced
- 1 tablespoon fresh ginger, grated
- 1 teaspoon salt
- 1/2 teaspoon sugar
Breading
- 1 cup rice flour or cornstarch
- Salt and pepper, to taste
For Frying
- Vegetable oil, for frying (about 3 cups, enough to deep fry)
Sauce and Toppings
- 1/4 cup Thai chili sauce
- 1/4 cup mayonnaise or plain yogurt
- 1/2 cucumber, thinly sliced
- 1/2 cup pickled carrots, thinly sliced
- Fresh cilantro leaves
- Fresh Thai basil leaves
- 4 soft buns or brioche buns, lightly toasted
Instructions
- Prepare the Marinade: In a bowl, combine the coconut milk, curry powder, minced garlic, grated ginger, salt, and sugar. Whisk these ingredients together until fully blended to create the flavorful marinade for the chicken.
- Marinate Chicken: Add the chicken thighs to the marinade, ensuring they are fully submerged. Cover and refrigerate for at least 1 hour, preferably 2-3 hours, to allow the flavors to deeply infuse the chicken.
- Prepare Breading: In a shallow dish, mix the rice flour or cornstarch with salt and pepper to taste. This mixture will create the crispy coating for the chicken when fried.
- Coat the Chicken: Remove the chicken thighs from the marinade, allowing excess to drip off. Dredge each piece thoroughly in the rice flour mixture, pressing lightly to ensure an even coating.
- Heat Oil: Pour vegetable oil into a deep skillet or frying pan to a depth suitable for deep frying (about 2-3 inches). Heat the oil over medium-high heat until it reaches 350°F (175°C) or a gentle sizzle occurs when a small amount of batter is added.
- Fry Chicken: Carefully place the coated chicken thighs into the hot oil. Fry for 5-7 minutes per side or until the chicken is golden brown, crispy, and fully cooked through (internal temperature of 165°F/74°C). Work in batches if necessary to avoid overcrowding.
- Drain Excess Oil: Remove fried chicken from oil and place on a wire rack or paper towels to drain any excess oil and maintain crispiness.
- Prepare Sauce: In a small bowl, mix the Thai chili sauce with mayonnaise or plain yogurt until smooth and well combined. This sauce adds a creamy, spicy kick to the sandwich.
- Assemble Sandwich: Lightly toast the buns or brioche to add a slight crunch. Spread a generous amount of the Thai chili mayo on both top and bottom buns. Layer the bottom bun with the fried chicken, followed by cucumber slices, pickled carrots, fresh cilantro, and Thai basil leaves. Top with the remaining bun.
- Serve: Serve the Thai Fried Chicken Sandwich immediately while the chicken is warm and crispy for the best flavor and texture experience.
Notes
- Marinating the chicken overnight allows for even deeper flavor penetration.
- Use rice flour for a gluten-free option instead of cornstarch.
- Ensure the oil temperature is steady to prevent greasy or undercooked chicken.
- Pickled carrots add a nice tangy contrast; you can make your own by soaking julienned carrots in vinegar, sugar, and salt for 30 minutes.
- Customize the heat level by adjusting the amount or type of Thai chili sauce used.
- Use fresh herbs for authentic aromatic flavor. Substitute with parsley if unavailable.
- Leftover sandwiches can be reheated in a toaster oven to maintain crispiness.