Spooky Black Velvet Halloween Cake Recipe
There’s something truly captivating about the Spooky Black Velvet Halloween Cake Recipe — it’s not just a cake, it’s an experience. The deep, dark color paired with the richness of black cocoa gives it that mysterious, velvety allure that’s perfect for Halloween or any time you want a dramatic dessert. I remember baking this one last October, and my kitchen instantly transformed with the aroma of coffee and cocoa—it really sets the mood for a cozy, spooky night.
This cake strikes the perfect balance between moist richness and subtle tartness, thanks to a luscious blackberry compote filling that adds a delicious fruity surprise in every bite. Plus, with a creamy, black cocoa frosting that’s subtly sweet and silky smooth, this Spooky Black Velvet Halloween Cake Recipe will definitely impress your friends and family — trust me, you’ll want to make this your go-to Halloween treat year after year.
Ingredients You’ll Need
All the ingredients come together to build that uniquely dark and decadent flavor, with black cocoa as the star. Using fresh, quality ingredients, especially for the filling and frosting, really lifts the whole cake.
- White granulated sugar: Balances out the bitter notes from the cocoa and coffee perfectly.
- All purpose flour: Make sure to sift it for a light, tender crumb.
- Black cocoa powder: This is what gives the cake its signature dark velvet color and intense chocolate flavor.
- Baking soda: Helps the cake rise beautifully without becoming dense.
- Baking powder: Adds an extra lift to keep the texture just right.
- Salt: Enhances flavors and balances sweetness.
- Eggs: Use room temperature eggs to ensure smooth batter and better rise.
- Buttermilk: Adds moisture and a slight tang to complement the cocoa’s richness.
- Hot coffee: Don’t skip it! Coffee amplifies the chocolate flavor without overpowering.
- Canola oil: Keeps the cake tender and moist over days.
- Vanilla extract: Adds depth and warmth to the flavor profile.
- Fresh blackberries: Essential for a vibrant, juicy compote filling that cuts through the richness.
- White granulated sugar (for compote): Sweetens and thickens the blackberry filling.
- Fresh lemon juice: Adds acidity to brighten up the berry compote.
- Lemon zest: Adds a fresh citrus punch.
- Cinnamon stick: Adds a subtle spice note to the compote.
- Water: Helps cook down the blackberries into a luscious sauce.
- Cornstarch: Thickens the compote so it isn’t runny.
- Cream cheese: For a tangy richness in the frosting, softened for easy mixing.
- Unsalted butter: Adds creaminess and a smooth texture to the frosting.
- Powdered sugar: Makes the frosting luxuriously smooth and sweet.
- Salt (for frosting): Balances sweetness and enhances flavors.
- Black cocoa powder (for frosting): Keeps the frosting deeply dark and chocolatey.
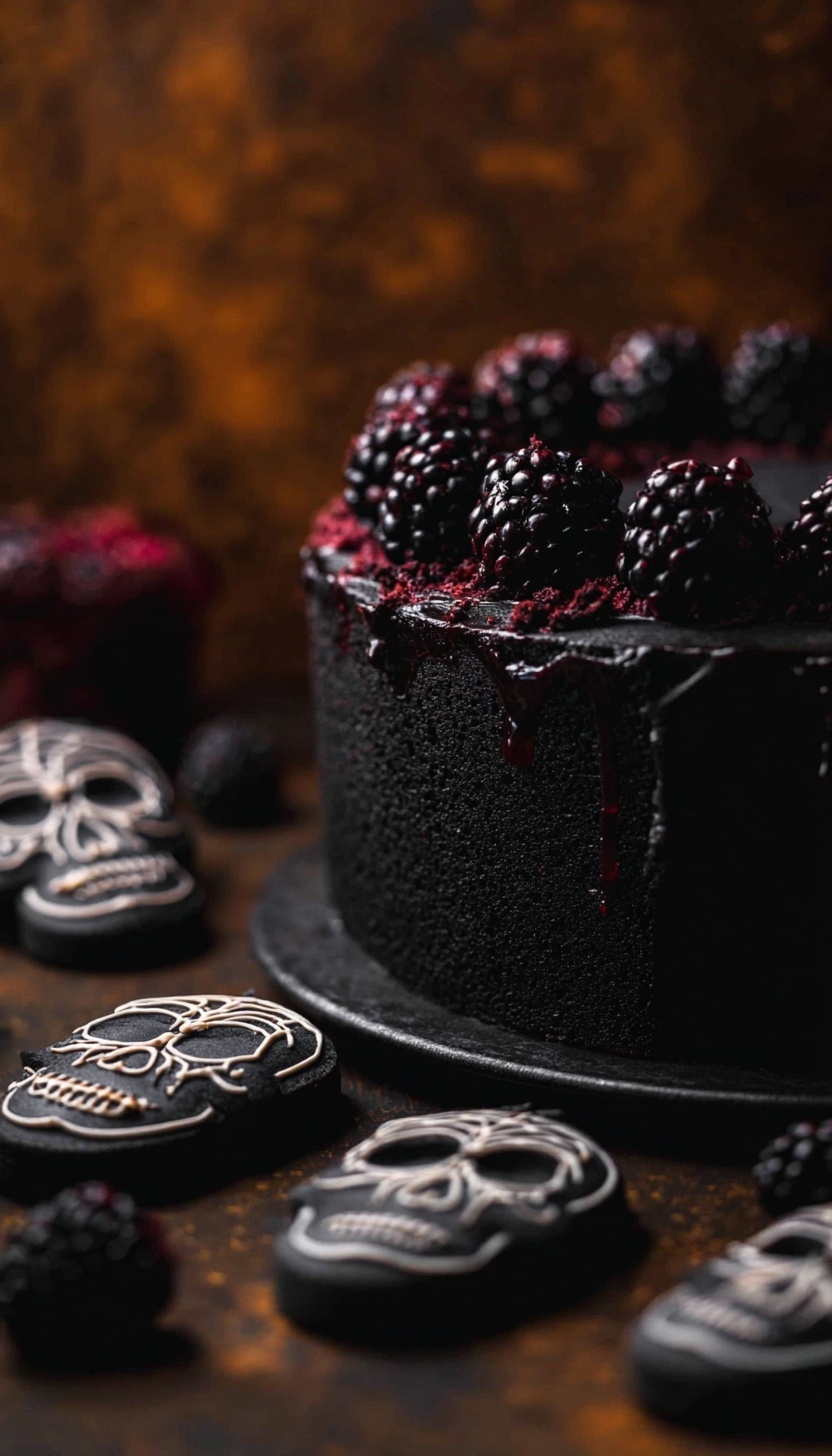
- Chocolate skulls, fresh blackberries, dried rose petals: Gorgeous for finishing touches to keep the spooky vibe alive.
Variations
This Spooky Black Velvet Halloween Cake Recipe is wonderfully flexible—feel free to make it your own! I love to switch up the filling or try different natural decorations depending on the vibe I want.
- Vegan Variation: I once replaced eggs with flaxseed and used coconut milk in place of buttermilk; the texture was a little different but still moist and delicious.
- Spiced Twist: Adding a pinch of ground cloves and nutmeg to the batter gives the cake a cozy fall spice note that’s perfect for cooler Halloween nights.
- Filling Swap: I’ve subbed blackberry compote with raspberry or cherry for a different tartness—it’s a fun way to keep things fresh!
- Nut-Free Version: Since this recipe doesn’t include nuts, it’s already safe for many with allergies, but always double-check your ingredients.
How to Make Spooky Black Velvet Halloween Cake Recipe
Step 1: Prep Your Dry Ingredients
Start by sifting the all-purpose flour, black cocoa powder, baking soda, baking powder, and salt into a large bowl. This step is key to avoid clumps and make sure your cake crumb is super tender. Trust me, sifting makes a big difference in texture—it’s worth taking a few extra minutes!
Step 2: Mix Wet Ingredients
In another bowl, whisk together room temperature eggs, sugar, buttermilk, hot coffee, canola oil, and vanilla extract. The hot coffee may seem odd but it really intensifies the chocolate without a coffee taste, which I learned after a few experiments. Mixing these well creates a smooth base that blends perfectly with the dry mixture.
Step 3: Combine and Bake
Slowly add the dry ingredients to the wet mix, stirring gently until just combined. Overmixing will make the cake tough, so be patient! Pour the batter evenly into two greased 8-inch round pans and bake at 350°F (175°C) for about 30-35 minutes. Use a toothpick to check doneness—it should come out clean or with a few moist crumbs.
Step 4: Prepare the Blackberry Compote Filling
While the cake cools, it’s perfect timing to make your blackberry compote. Combine fresh blackberries, sugar, lemon juice, lemon zest, cinnamon stick, and water in a saucepan. Bring to a simmer and cook for 10 minutes until berries soften, then stir in cornstarch mixed with a bit of water. Cook for 1-2 more minutes until thickened. Remove cinnamon stick and let it cool—it’s that simple! I usually make this a day ahead so the flavors get even better.
Step 5: Whip Up the Black Cocoa Frosting
Beat softened cream cheese and butter together until fluffy. Slowly add powdered sugar, black cocoa powder, salt, and vanilla extract, continuing to mix until creamy and smooth. If it feels too thick, a splash of milk can loosen it. The frosting is rich, tangy, and perfectly complements the deep cake.
Step 6: Assemble Your Spooky Black Velvet Halloween Cake
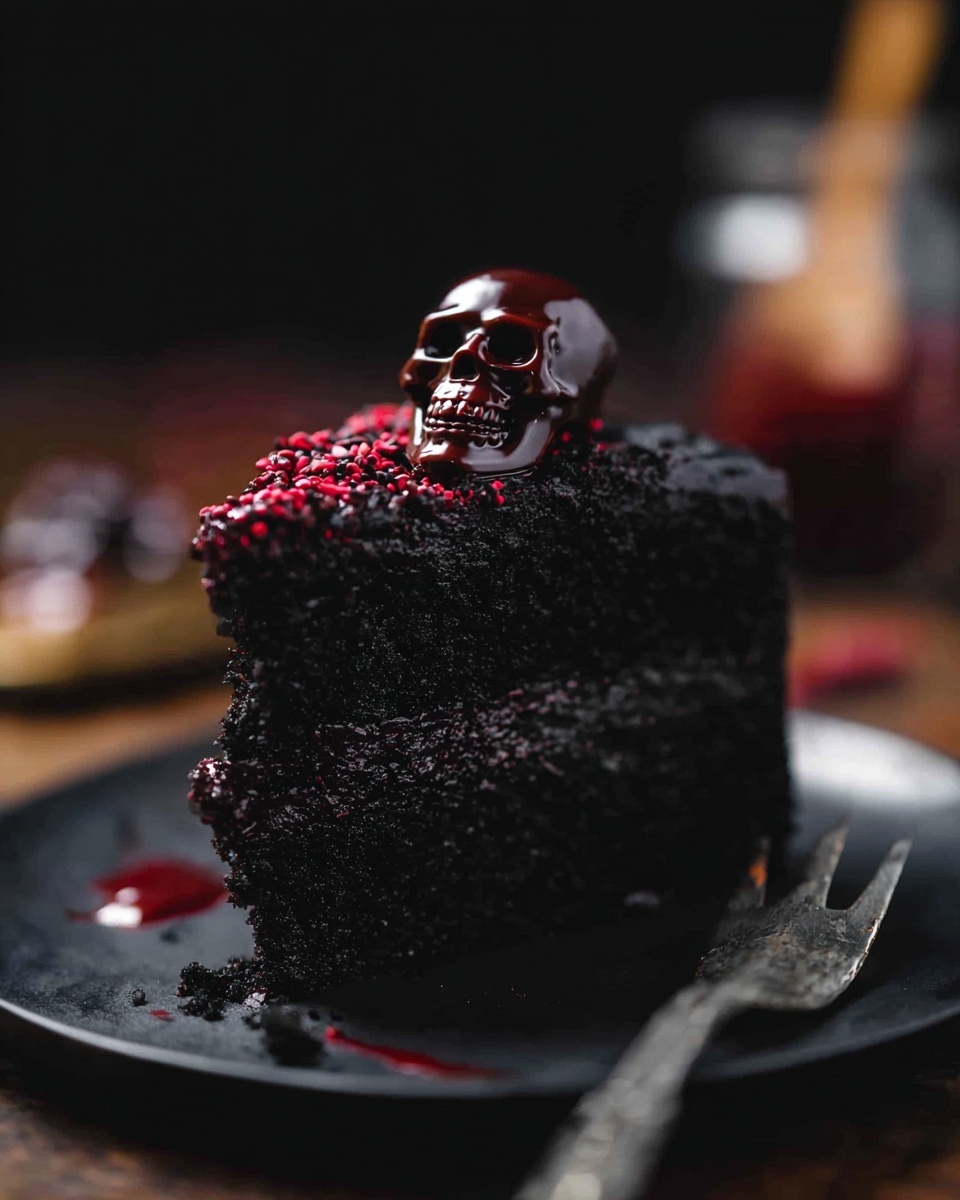
Place one cake layer on your serving plate, spread the blackberry compote over it generously, then top with the second cake layer. Cover the entire cake with the black cocoa frosting. This part is so fun—spread it evenly and get creative with your frosting textures if you like. Finally, decorate with chocolate skulls, fresh blackberries, and dried rose petals to nail that spooky Halloween vibe.
How to Serve Spooky Black Velvet Halloween Cake Recipe
Garnishes
I’m a big fan of using chocolate skulls for that dramatic effect—they instantly elevate the look. Throw in fresh blackberries to echo the filling’s flavor, plus some dried rose petals for a moody yet elegant touch. These little details make the cake feel special and festive, and guests always ask how I made it look so striking.
Side Dishes
To keep the spooky theme but balance richness, I like serving this cake with a light citrus salad or even a cup of hot spiced tea. Something simple and fresh pairs best to cut through the velvety chocolate flavors without overwhelming the palate.
Creative Ways to Present
For Halloween parties, I’ve arranged the cake on a vintage silver platter surrounded by little dry ice “fog” for a smoky effect—talk about spooky! You can also place little edible flowers or use black or orange sprinkles for a kid-friendly version. The key is having fun and matching your presentation to the mood you want to create.
Make Ahead and Storage
Storing Leftovers
I store leftovers tightly wrapped or in an airtight container in the fridge. The cake keeps its moisture beautifully for up to 4 days, though I doubt it lasts that long! Bringing it back to room temperature before serving helps soften the frosting and brings back that fresh-baked feel.
Freezing
Freezing this cake also works well. I like to freeze individual layers without frosting wrapped in plastic wrap and foil separately—then thaw overnight in the fridge when I want to assemble. Finished cakes can be frozen after frosting but may experience slight texture changes in the frosting’s smoothness.
Reheating
I usually don’t heat the cake too much since it’s moist and delicate, but a few minutes at room temperature or a quick 10-second zap in the microwave (just to soften the frosting) works wonders. Just be careful not to overheat, or the cream cheese frosting might melt too much.
FAQs
-
Can I make the Spooky Black Velvet Halloween Cake Recipe ahead of time?
Absolutely! You can bake the cake layers a day or two ahead, prepare the blackberry compote in advance, and even make the frosting a day early. Just store each component properly in the fridge, and assemble the cake on the day you plan to serve for maximum freshness.
-
What’s the difference between black cocoa and regular cocoa powder?
Black cocoa powder is much darker and has a more intense, almost charcoal-like color, which is perfect for that deep black velvet effect. It tends to be less acidic and slightly less bitter than regular cocoa powder, resulting in a smooth, rich chocolate flavor that’s ideal for this spooky cake.
-
Can I substitute the blackberry compote with another fruit?
Yes! Raspberries, cherries, or even a mixed berry compote work beautifully. Just make sure to adjust sugar and thickness so the filling isn’t too runny, as this helps keep the cake layers intact.
-
Is this cake difficult to make for beginner bakers?
Not at all. While it has several components, each is straightforward and beginner-friendly if you take your time. The step-by-step process and practical tips shared here will guide you through smoothly—you’ve got this!
-
What can I use if I don’t have buttermilk?
An easy DIY buttermilk substitute is mixing 1 cup of milk with 1 tablespoon of lemon juice or vinegar. Let it sit for 5-10 minutes to curdle before using. This will give your batter the same moisture and tang.
Final Thoughts
The Spooky Black Velvet Halloween Cake Recipe has become a little tradition in my household—each year, it brings so much joy and spooky spirit to our celebrations. I love how it’s rich yet balanced, dark but inviting, and pretty straightforward despite its elegant appearance. If you want to wow your guests or just treat yourself to a spectacular dessert this Halloween (or anytime!), I wholeheartedly recommend giving this recipe a go. You’ll enjoy the process as much as the slice, and that’s the real magic to me.
PrintSpooky Black Velvet Halloween Cake Recipe

This Spooky Black Velvet Halloween Cake is a dramatic and delicious treat perfect for the spooky season. Featuring a moist and deeply chocolatey black velvet cake layered with a tart blackberry compote and finished with a rich black cocoa cream cheese frosting, this cake is both visually striking and packed with flavor. Elegant Halloween decorations like chocolate skulls, fresh blackberries, and dried rose petals complete the eerie presentation.
- Prep Time: 30 minutes
- Cook Time: 35 minutes
- Total Time: 1 hour 15 minutes
- Yield: 12 servings
- Category: Dessert
- Method: Baking
- Cuisine: American
Ingredients
Black Velvet Cake
- 2 cups white granulated sugar
- 2 cups all-purpose flour, sifted
- ¾ cup black cocoa powder, sifted
- 2 teaspoons baking soda
- 1 teaspoon baking powder
- 1 teaspoon salt
- 2 eggs, room temperature
- 1 cup buttermilk, room temperature
- 1 cup hot coffee
- ½ cup canola oil
- 2 teaspoons vanilla extract
Blackberry Compote Filling
- 2 cups fresh blackberries
- 2 tablespoons white granulated sugar
- 1 tablespoon fresh lemon juice
- 1 teaspoon lemon zest
- 1 cinnamon stick
- ¼ cup water
- 1 tablespoon cornstarch
Black Cocoa Frosting
- 8 oz cream cheese, softened
- ½ cup unsalted butter, softened
- 3 cups powdered sugar, sifted
- 1 cup black cocoa powder, sifted
- ¼ teaspoon salt
- 1 teaspoon vanilla extract
Decorations
- Chocolate skulls
- Fresh blackberries
- Dried rose petals
Instructions
- Prepare the Cake Batter: In a large bowl, combine sugar, sifted flour, black cocoa powder, baking soda, baking powder, and salt. In another bowl, whisk eggs, buttermilk, hot coffee, canola oil, and vanilla extract until well blended. Gradually add wet ingredients to the dry ingredients, mixing until smooth and homogenous.
- Bake the Cake: Preheat the oven to 350°F (175°C). Grease and flour two 9-inch cake pans. Divide the batter evenly between the pans. Bake for 30–35 minutes or until a toothpick inserted into the center comes out clean. Let cakes cool in pans for 10 minutes, then turn out onto a wire rack to cool completely.
- Make the Blackberry Compote Filling: In a medium saucepan, combine blackberries, sugar, lemon juice, lemon zest, cinnamon stick, and water. Cook over medium heat until the berries break down and mixture thickens, about 10 minutes. Mix cornstarch with a tablespoon of cold water to create a slurry, then stir into the compote and cook for 2 more minutes until thickened. Remove cinnamon stick and cool completely.
- Prepare the Black Cocoa Frosting: In a large bowl, beat the softened cream cheese and butter together until smooth and fluffy. Gradually add powdered sugar and black cocoa powder, beating continuously. Add salt and vanilla extract and mix until fully combined and creamy.
- Assemble the Cake: Place one cake layer on a serving plate. Spread a generous layer of blackberry compote evenly over the top. Place the second cake layer on top. Use the black cocoa frosting to cover the entire cake smoothly.
- Decorate: Arrange chocolate skulls, fresh blackberries, and dried rose petals creatively on top of the frosted cake to achieve a spooky Halloween theme. Chill the cake for at least 30 minutes before serving to set the frosting.
Notes
- Ensure all wet ingredients are at room temperature for better mixing and texture.
- Black cocoa powder is essential for the unique deep black color; do not substitute with regular cocoa powder.
- The blackberry compote can be made a day ahead and stored in the refrigerator.
- Chilling the cake before serving helps the frosting set and enhances flavors.
- Handle fresh blackberries gently to avoid crushing.
- The cake is best enjoyed within 3 days when refrigerated.