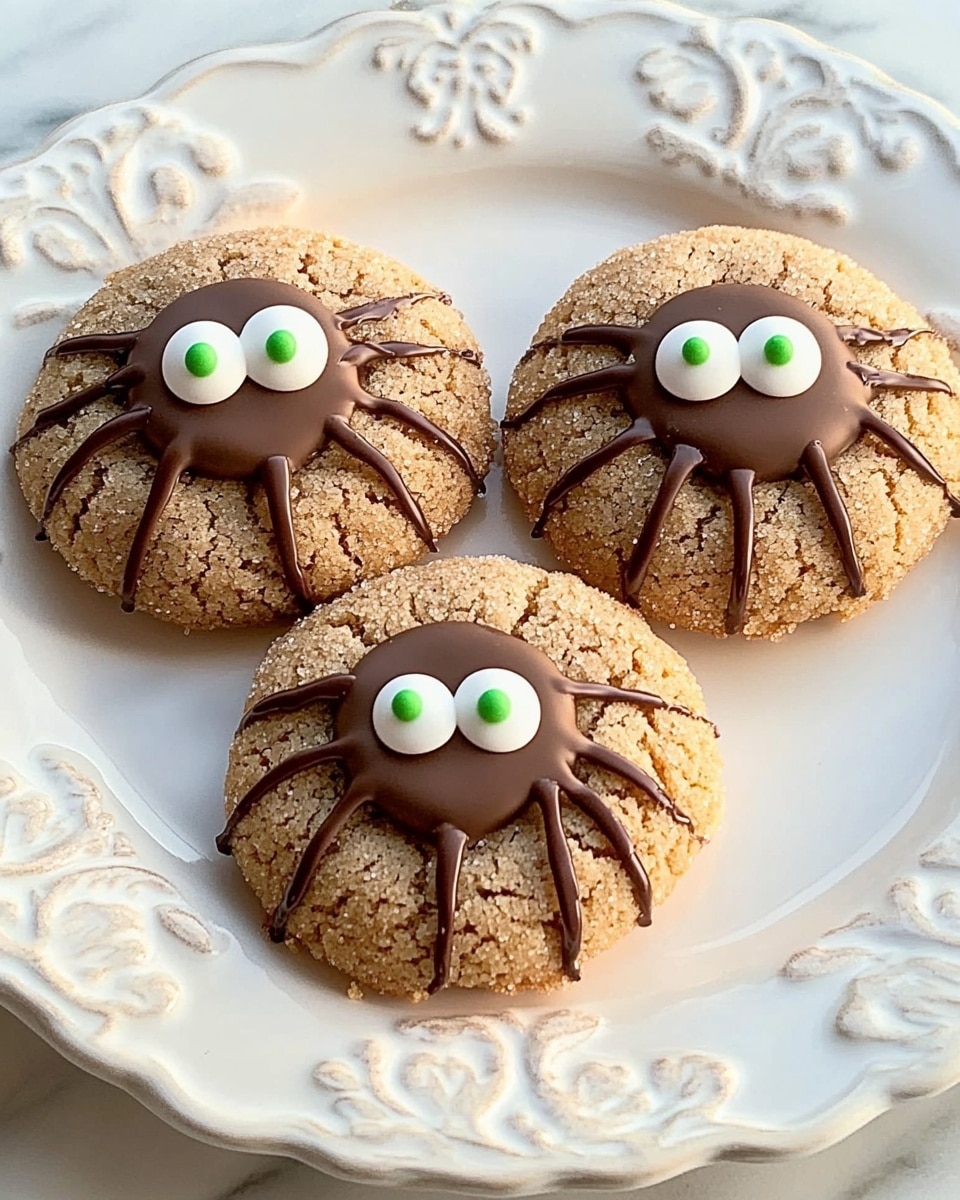
Peanut Butter Spider Cookies Recipe
If you love peanut butter and adore quirky, fun cookies, you’re going to be absolutely charmed by this Peanut Butter Spider Cookies Recipe. These aren’t just any cookies — they’re a playful, delicious twist perfect for Halloween parties, kid’s gatherings, or when you just want to bring a little whimsy into the kitchen. I first made them on a whim for a spooky-themed bake sale, and watching everyone’s eyes light up was priceless.
What I really enjoy about the Peanut Butter Spider Cookies Recipe is how approachable it is, even if baking isn’t usually your thing. The ingredients are simple pantry staples, and the decorating process is a breeze that adds so much character. Plus, the cozy peanut butter flavor balanced with the sweet trick of those chocolate-filled candy spheres inside keeps you coming back for more.
Ingredients You’ll Need
Each ingredient plays its part in creating that perfectly chewy, nutty cookie with just the right amount of sweetness and a fun, spooky look. I like to use real peanut butter (no hydrogenated oils) for the richest flavor, and picking good-quality chocolate candy makes all the difference.
- Shortening: Helps keep the cookies tender and adds a subtle richness.
- Peanut butter: Choose creamy peanut butter for smooth texture and pronounced flavor.
- Brown sugar: Adds moisture and a caramel-like depth.
- White sugar: Balances sweetness and aids in cookie spread.
- Egg: Provides structure and binds ingredients together.
- Milk: Keeps the dough moist and lends softness.
- Vanilla extract: Enhances all the flavors beautifully.
- All-purpose flour: The main base for your cookie dough.
- Baking soda: Gives a little lift and helps with spreading.
- Salt: Crucial for balancing sweetness and enhancing the peanut butter taste.
- White sugar (for rolling): Creates a slightly crunchy coating on the cookie’s exterior.
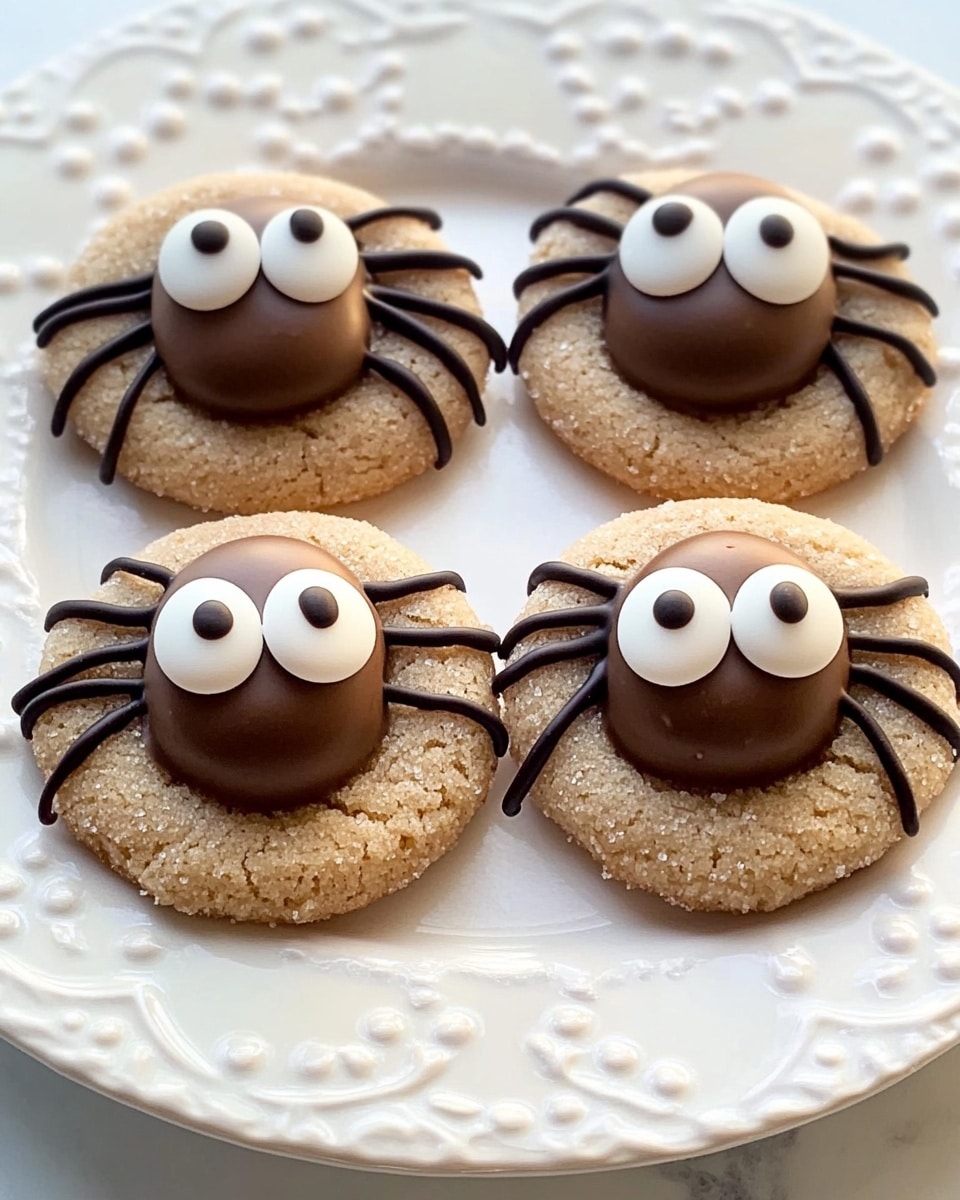
- Chocolate candy spheres (such as Lindt Lindor Truffles): Adding these chilled is key for that gooey surprise inside each cookie.
- Decorative candy eyeballs: Bring your spiders to life—kids love this touch!
- Prepared chocolate frosting: Acts like “glue” to attach the candy eyes securely.
Variations
One of the best parts about the Peanut Butter Spider Cookies Recipe is how easy it is to make it your own. I’ve tried adding a pinch of cinnamon or a splash of almond extract for a fun twist, but you can get creative with the candy eyes or the type of chocolate you stuff inside.
- Nut-Free Variation: Swap peanut butter for sunflower seed butter to accommodate allergies—still delicious and you can keep the spider theme intact!
- Chocolate Lovers’ Version: Mix in chocolate chips with the dough for an extra chocolate hit beyond the candy centers. I love this for a more indulgent treat.
- Vegan Option: Use vegan shortening, flax egg instead of chicken egg, and vegan milk for a plant-powered version. I tweaked the recipe this way when hosting a vegan crowd, and it was a hit.
- Spooky Seasonal Colors: Use colored frosting or candy eyes to match different holidays beyond Halloween—think pastel eyes for spring or red for Valentine’s Day.
How to Make Peanut Butter Spider Cookies Recipe
Step 1: Cream together your fats and sugars
Start by combining the shortening, peanut butter, brown sugar, and white sugar in a large bowl. I use a hand mixer here, but a sturdy wooden spoon works if you want to get a little arm workout. Cream these together until smooth and fluffy—that’s about 2-3 minutes. This step is crucial because it makes the cookies tender and gives them a nice rise.
Step 2: Add wet ingredients
Next, beat in the egg, milk, and vanilla extract until everything is well incorporated. The mixture might look a little loose, but don’t worry, the dry ingredients coming next will bring it all together. Make sure to scrape down the sides of your bowl to incorporate all that sweetness!
Step 3: Mix in dry ingredients
In a separate bowl, whisk together the flour, baking soda, and salt. Gradually add these to your wet mixture, stirring until just combined. Overmixing can make cookies tough, so I stop as soon as there are no visible flour streaks.
Step 4: Shape, chill, and roll
Chill the dough for about 30 minutes if you can—it makes shaping easier and keeps the chocolate centers from melting too soon. Once chilled, scoop out tablespoon-sized balls and roll them in the extra white sugar for a slightly crunchy finish.
Step 5: Stuff each cookie with a cold chocolate sphere
This part is my favorite! Press a cold chocolate candy sphere into the center of each sugar-coated dough ball, then gently fold the dough around it to seal the chocolate inside. Keep the candies refrigerated until the last minute to prevent melting, or even freeze them briefly.
Step 6: Bake to perfection
Bake the cookies at 350°F (175°C) for 12-14 minutes, until the edges just start to brown but the cookies remain soft in the middle. They’ll firm up as they cool, so be careful not to overbake. I usually test one cookie early if I’m unsure.
Step 7: Decorate your Spider Cookies
Once the cookies are cool, use a small dab of prepared chocolate frosting to attach two candy eyeballs to each cookie. This frosting acts like edible glue to keep them firmly in place—and it’s fun to see how expressive your spiders can get!
How to Serve Peanut Butter Spider Cookies Recipe
Garnishes
I love adding a sprinkle of crushed peanuts or a light dusting of powdered sugar for a simple finish. Sometimes, I’ll drizzle a little melted dark chocolate over the top for added flair and richness. It makes them extra special when serving guests.
Side Dishes
These cookies pair wonderfully with a cold glass of milk or a warm cup of coffee or tea—perfect for an afternoon snack or post-dinner treat. For a party, I like to place them alongside fresh fruit or small bowls of mixed nuts for variety and texture contrast.
Creative Ways to Present
For Halloween, I’ve arranged these cookies on a dark platter lined with faux spider webs and scattered plastic spiders for a spooky effect. Another time, I created a “spider web” serving board by piping extra frosting in a web pattern around the cookies. Kids get a kick out of helping make these, turning the decorating into a fun activity.
Make Ahead and Storage
Storing Leftovers
I keep leftover Peanut Butter Spider Cookies in an airtight container at room temperature for up to 4 days. To keep them from sticking together, I place wax paper between layers. They stay soft and tasty, but the candy eyes hold up best when not exposed to moisture.
Freezing
If you want to make these ahead for a party, the dough freezes well before baking. I individually shape the balls, wrap them tightly, then freeze in a sealed bag. When ready, bake straight from frozen, adding a minute or two to the baking time. This is a lifesaver for busy days!
Reheating
If you have leftover baked cookies, I’ll warm them in a low oven (about 300°F) for 5 minutes to bring back that fresh-baked feeling and re-soften the centers. Microwave for 10 seconds works too but be cautious not to melt your chocolate eyes or candy centers too much.
FAQs
-
Can I use natural peanut butter for this Peanut Butter Spider Cookies Recipe?
Yes, you can! Just keep in mind that natural peanut butter tends to be oilier and less stable, which might affect the texture slightly. If you use natural peanut butter, stir it well before measuring and consider chilling the dough a bit longer before baking to help with spreading.
-
Why should the chocolate candy spheres be cold before baking?
Keeping the chocolate candy spheres chilled or even frozen before inserting them helps prevent them from melting too quickly during baking. This ensures you get a gooey center instead of chocolate oozing all over the baking sheet—plus, it helps shape the cookie more easily.
-
Can I skip the candy eyeballs?
Absolutely! The eyeballs add to the spider look and are super fun, especially for kids, but if you don’t have them on hand you can always leave them off or substitute with chocolate chips or small candy dots. The cookies will still taste amazing.
-
How do I prevent the dough from sticking when shaping cookies?
Rolling the dough balls in white sugar before baking helps a lot with stickiness and gives a delightful slight crunch. You can also lightly flour your hands or use a small cookie scoop to portion the dough evenly.
-
Can I make these cookies gluten-free?
Yes! Substitute the all-purpose flour with a gluten-free baking blend that measures cup-for-cup like regular flour. Just be sure it’s one that contains xanthan gum or another binder for the best texture.
Final Thoughts
Honestly, this Peanut Butter Spider Cookies Recipe holds a special place in my heart because it’s one of those sweet treats that brings smiles and fun to any gathering. Whether you’re baking them with kids or surprising your friends with some creative flair, they’re just plain delightful. Give this recipe a try—you’ll enjoy that perfect blend of peanut buttery goodness and surprise chocolate centers, with a whimsical spider twist that’s hard to beat.
PrintPeanut Butter Spider Cookies Recipe

These Peanut Butter Spider Cookies are a fun and festive treat perfect for Halloween or any spooky occasion. Soft peanut butter cookies rolled in sugar are topped with chocolate-filled candy spheres and candy eyeballs to create adorable, creepy spider faces. The combination of peanut butter and chocolate makes these cookies deliciously irresistible and perfect for sharing with friends and family.
- Prep Time: 20 minutes
- Cook Time: 12 minutes
- Total Time: 1 hour 2 minutes
- Yield: 24 cookies
- Category: Baking
- Method: Baking
- Cuisine: American
Ingredients
Cookie Dough
- ½ cup shortening
- ½ cup peanut butter
- ½ cup packed brown sugar
- ½ cup white sugar
- 1 large egg, beaten
- 2 tablespoons milk
- 1 teaspoon vanilla extract
- 1 ¾ cups all-purpose flour
- 1 teaspoon baking soda
- ½ teaspoon salt
- ¼ cup white sugar for rolling
Decorations
- 24 chocolate candy spheres with smooth chocolate filling (such as Lindt Lindor Truffles), refrigerated until cold
- 48 decorative candy eyeballs
- ½ cup prepared chocolate frosting
Instructions
- Prepare the Dough: In a large mixing bowl, cream together the shortening, peanut butter, brown sugar, and white sugar until light and fluffy. Beat in the egg, milk, and vanilla extract until well combined.
- Combine Dry Ingredients: In a separate bowl, whisk together the flour, baking soda, and salt. Gradually add the dry ingredients to the wet ingredients, mixing until a soft dough forms.
- Chill the Dough: Cover the dough and refrigerate it for at least 30 minutes to firm up, making it easier to handle.
- Form the Cookies: Preheat the oven to 350°F (175°C). Roll the dough into 1-inch balls, then roll each ball in the ¼ cup of white sugar to coat evenly. Place the sugar-coated dough balls 2 inches apart on an ungreased baking sheet.
- Bake the Cookies: Bake the cookies for 10-12 minutes or until they are just set and slightly golden around the edges. Remove from the oven and let cool slightly on the baking sheet.
- Add Chocolate Spheres: While the cookies are still warm, gently press one cold chocolate candy sphere in the center of each cookie. This will slightly melt the chocolate and help it adhere.
- Decorate the Spiders: Use the prepared chocolate frosting to attach two candy eyeballs to each chocolate sphere, creating the spider’s eyes. Also, pipe or spread chocolate frosting around the candy to create spider legs or other decorative features as desired.
- Cool Completely: Allow the cookies to cool completely on the baking sheet so the chocolate spheres and frosting set firmly.
- Serve and Enjoy: Once cooled, transfer the cookies to a serving plate. These festive Peanut Butter Spider Cookies are ready to delight guests with their spooky charm and delicious flavor.
Notes
- Make sure the chocolate spheres are well chilled before placing on warm cookies to prevent excessive melting.
- Use prepared chocolate frosting for easy and clean decorating.
- For a smaller batch, halve the recipe accordingly.
- Store cookies in an airtight container at room temperature for up to 3 days or refrigerate for a longer shelf life.
- Decorate with additional frosting details if desired to enhance the spider design.