Easy Halloween Cupcakes Recipe
If you’re on the hunt for a fun, no-fuss treat that brings spooky season to life, this Easy Halloween Cupcakes Recipe is going to become your new go-to. I love how simple it is to turn ordinary cupcakes into themed masterpieces that delight both kids and grown-ups alike. Whether you’re prepping for a school party, a cozy family gathering, or just craving a festive bite, these cupcakes hit the sweet spot every time.
What makes this recipe really special is how you can customize each cupcake with unique decorations that are quick but still look impressive. You don’t need to be a pro baker to nail these spooky designs, and I’m going to share my personal tips so you’ll breeze through the process and wow everyone with minimal stress.
Ingredients You’ll Need
The best part about this Easy Halloween Cupcakes Recipe is that the ingredients are simple and easy to find, yet they come together for a seriously festive treat. You’ll notice I rely on classic store-bought items that make decorating quick and keep the cupcakes moist and irresistible.
- Unfrosted cupcakes: Use your favorite store-bought or homemade cupcakes; vanilla or chocolate both work perfectly.
- Prepared chocolate frosting: A rich, smooth chocolate frosting is key for “gluing” the decorations and adding flavor contrast.
- Red licorice strips: These are great for making spider legs—make sure they’re flexible and easy to cut.
- Candy-coated milk chocolate pieces (like M&M’s®): Perfect for spider eyes or fun color pops.
- Chocolate cookie crumbs: Adds texture for “dirt” or graveyard effect; use crushed sandwich or chocolate cookies.
- Gummy worms: A classic, creepy crawly topping that kids love and perfect for the worm cupcake design.
- Rectangular or oval sandwich cookies (Milano® style): These make excellent “gravestones” with minimal effort.
Variations
One thing I always tell friends is don’t be afraid to make this recipe your own! I like to swap out decorations based on what I have or introduce new flavors depending on the crowd. It’s all about keeping the vibe playful and simple.
- Variation: I once replaced the chocolate frosting with cream cheese frosting tinted orange for a pumpkin vibe—it was a hit with the kids.
- Dietary tweaks: For gluten-free guests, you can use gluten-free cupcakes and cookie substitutes easily available at most stores.
- Seasonal spins: Try adding edible glitter or sprinkles in Halloween colors if you want a sparkle effect that pops on party tables.
How to Make Easy Halloween Cupcakes Recipe
Step 1: Prep Your Base Cupcakes
Start with 12 unfrosted cupcakes — these can be homemade or store-bought, but I’ve found that just plain chocolate or vanilla cake really lets the decorations shine. Line them up on your counter or a baking sheet so you have a clean workspace for decorating.
Step 2: Make Your Decorations Sticky with Frosting
Spoon about half a cup of prepared chocolate frosting into a small bowl. You’ll use this to “glue” the licorice legs, candy eyes, worms, and cookie crumbs into place. I like to spread a thin layer on each cupcake first — it helps everything stick and tastes delicious, too.
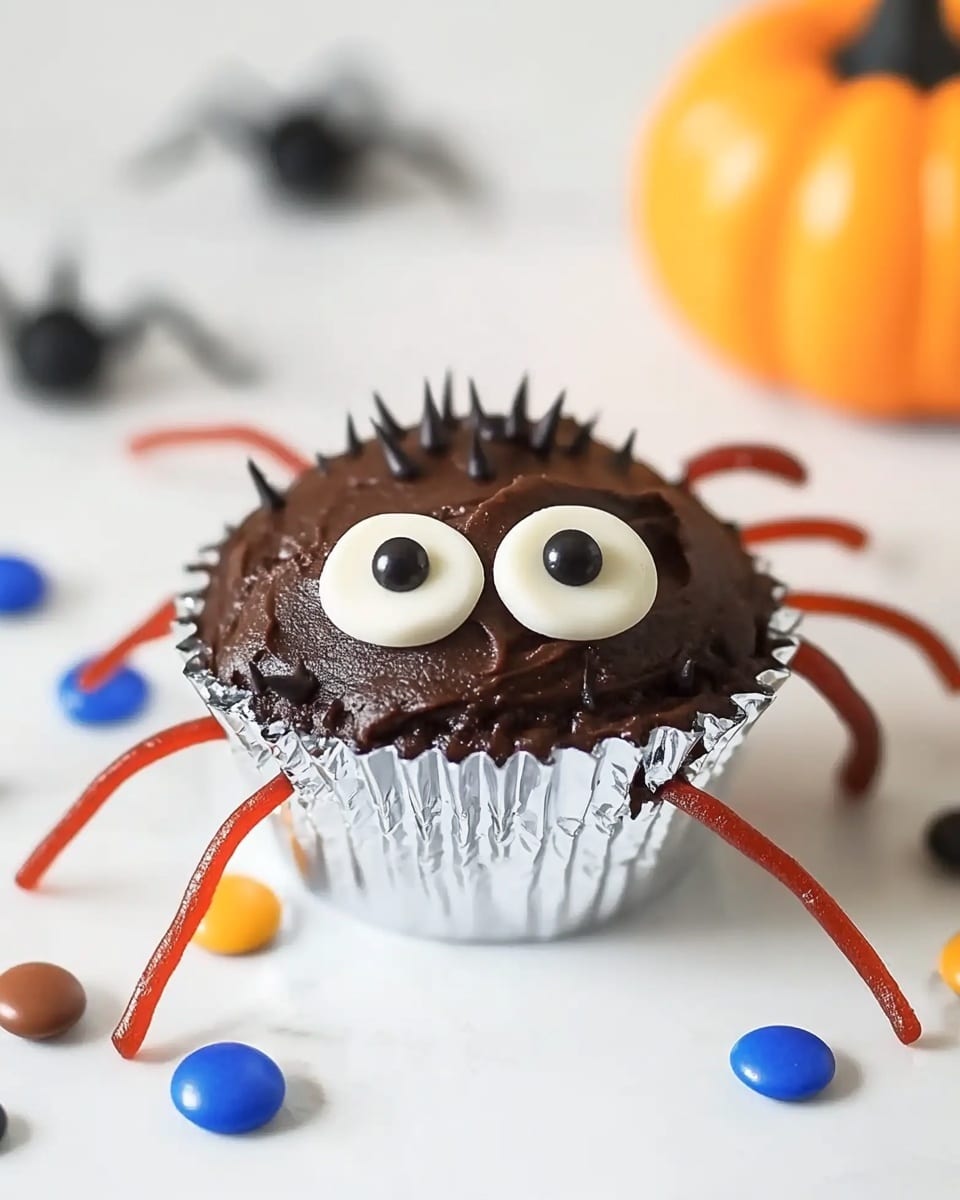
Step 3: Create the Spider Cupcakes
Grab 8 strips of red licorice per cupcake and cut them into shorter “legs.” Press them gently into the frosting on each cupcake. Add 2 candy-coated milk chocolate pieces for the spider’s eyes right in the center. It’s NOT as tricky as it sounds — just squish gently and work quickly before the frosting sets.
Step 4: Assemble the Worm Cupcakes
Spread a thin layer of chocolate frosting on each cupcake, then sprinkle a generous pinch of chocolate cookie crumbs on top for a dirt effect. Lay 1 or 2 gummy worms partly embedded into the crumbs, so it looks like they’re crawling out of the dirt. This is always a crowd-pleaser!
Step 5: Craft the Graveyard Cupcakes
Start with a thick layer of chocolate frosting on your cupcake. Sprinkle chocolate cookie crumbs over the top for “soil,” then gently insert a sandwich cookie standing upright into the frosting to mimic a gravestone. For an extra touch, you can write tiny “RIP” letters on the cookie with edible markers or melted white chocolate.
How to Serve Easy Halloween Cupcakes Recipe

Garnishes
I usually keep garnishes simple but fun. Besides the candies mentioned, I like adding some orange and black sprinkles or edible googly eyes for that extra novelty factor. They make the cupcakes so much more eye-catching, especially for kids.
Side Dishes
Pair these cupcakes with something light and refreshing like a sparkling apple cider or a warm cup of spooky-themed hot cocoa to balance the sweetness. At parties, I also love setting out a fruit platter with seasonal favorites like sliced apples and persimmons for a colorful contrast.
Creative Ways to Present
For Halloween, I’ve served these cupcakes on a tiered cake stand decorated with cobwebs and tiny plastic spiders for a dramatic centerpiece. You can also wrap each in mini treat boxes or clear bags tied with orange and black ribbons if you’re passing them out as favors.
Make Ahead and Storage
Storing Leftovers
Leftover cupcakes keep best stored in an airtight container at room temperature for up to 2 days, especially if you plan to serve them soon after. I’ve found that refrigeration can dry them out, so I usually avoid refrigerating unless the room is very warm.
Freezing
If you want to make these ahead of time, cupcakes freeze beautifully. I freeze them unfrosted on a tray until firm, then wrap each tightly in plastic wrap and place them in a freezer bag. When ready, thaw overnight in the fridge and decorate fresh to keep that bright, festive look.
Reheating
Since these are cupcakes, reheating isn’t usually needed, but if you prefer them warm, just pop one in the microwave for 10-15 seconds. Be careful not to overheat or the frosting might melt and decorations lose their shape.
FAQs
-
Can I use different cupcake flavors for the Easy Halloween Cupcakes Recipe?
Absolutely! These cupcakes are versatile and taste great with chocolate, vanilla, or even pumpkin spice flavors. The decorations work well regardless of the base, so feel free to choose your favorite.
-
Are the candy decorations kid-friendly?
Yes, the candies like licorice, gummy worms, and chocolate pieces are commonly enjoyed by kids. Just keep an eye on younger children to avoid choking hazards, especially with small pieces like the chocolate candies.
-
How long can these cupcakes be stored decorated?
Once decorated, they are best eaten within 1-2 days to enjoy peak freshness and decoration stability. If you need to store longer, keep them refrigerated but be aware that frosting may harden or decorations may shift.
-
Can I prepare decorations in advance?
Definitely! You can pre-cut licorice strips, crush cookies, and sort candies a day ahead. Just store them in airtight containers so they stay fresh and ready for quick assembly on party day.
-
What’s the best frosting to use for this recipe?
I recommend a smooth, creamy chocolate frosting—it sticks well and complements the flavors perfectly. You can use store-bought or homemade frosting, whichever you prefer.
Final Thoughts
This Easy Halloween Cupcakes Recipe holds a special place in my heart because it combines simple ingredients with creative play, making the whole baking experience so much fun. I know you’ll enjoy how straightforward it is to whip up these spooky delights and how big a smile they bring to everyone’s face. So next time Halloween rolls around, grab your cupcakes and decorations—and have a blast turning them into creepy-cute treats that everyone will love!
PrintEasy Halloween Cupcakes Recipe
Celebrate Halloween with these fun and spooky Easy Halloween Cupcakes, perfect for adding a creepy-crawly charm to your party table. Choose from three creative decoration styles—spider, worm, or graveyard—to customize your cupcakes with chocolate frosting, licorice, gummy worms, and cookie crumbs for a festive treat everyone will love.
- Prep Time: 15 minutes
- Cook Time: 0 minutes
- Total Time: 15 minutes
- Yield: 12 decorated cupcakes
- Category: Dessert
- Method: No-Cook
- Cuisine: American
Ingredients
Basic Cupcakes
- 12 unfrosted cupcakes
Spider Cupcake Decoration
- ½ cup prepared chocolate frosting
- 8 strips red licorice
- 12 candy-coated milk chocolate pieces (such as M&M’s®)
Worm Cupcake Decoration
- ½ cup prepared chocolate frosting
- ¼ cup chocolate cookie crumbs
- 4 gummy worm candies
Graveyard Cupcake Decoration
- 1 cup prepared chocolate frosting
- 4 rectangular or oval sandwich cookies (such as Milano®)
- ¼ cup chocolate cookie crumbs
Instructions
- Prepare Cupcakes: Start with 12 unfrosted cupcakes at room temperature. These will serve as the base for your Halloween decorations.
- Decorate Spider Cupcakes: Spread about a teaspoon of chocolate frosting on each cupcake. Place candy-coated milk chocolate pieces on top for the spider bodies. Cut red licorice strips into small sections to create spider legs by inserting around each candy spider body.
- Decorate Worm Cupcakes: Frost cupcakes with chocolate frosting, then sprinkle chocolate cookie crumbs evenly over the top to create soil texture. Lay gummy worm candies partially buried on the surface to resemble worms coming out of the soil.
- Decorate Graveyard Cupcakes: Spread chocolate frosting generously on cupcakes. Crumble chocolate cookie crumbs to resemble dirt and sprinkle them on top. Break sandwich cookies like Milano® into small rectangles or ovals to mimic gravestones and stand them upright in the frosting.
- Serve and Enjoy: Arrange the decorated cupcakes on a platter for a spooky Halloween display. Serve immediately or store covered at room temperature until ready to enjoy.
Notes
- If desired, you can make your own chocolate frosting instead of using prepared.
- Red licorice strips can be substituted with any similar candy for spider legs.
- For a dairy-free option, use vegan chocolate frosting and candies.
- The decorating ideas can be mixed and matched or combined on cupcakes for variety.
- Store leftover decorated cupcakes in an airtight container at room temperature for up to 2 days.